


Choosing and Using the Right Background for Your Jewelry Photographs
Choosing the best background for your piece is important to show it to its best advantage, and to meet the requirements of your desired use. When people send me photographs for editing, I usually have to ask them to retake the photograph because the background may have been perfect for one use, but not for the competition, juried show, or publication for which the artist now wants to use it. Here’s what you need to know about selecting and setting up the right background for your photo, with a few simple tips.
Choosing Your Background Material
This is one of my top tips for a more professional photograph: choose a pliable material for your background, such as paper or craft foam. Put it underneath your piece on the table, and curve the top part of the paper up behind the piece and tape it to your wall. Now there is no visible seam, or horizon, in the background to distract from your jewelry.
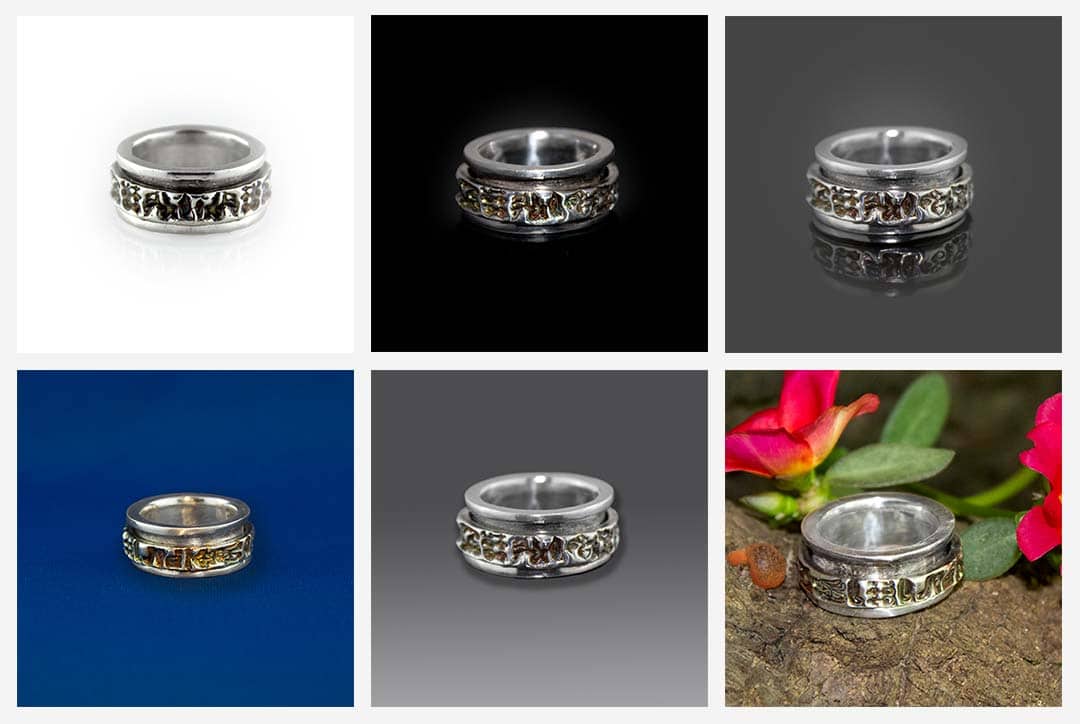
White Background
White backgrounds are the most versatile. This is the look that most prefer, sellers and consumers alike, and it’s perfect for competitions, juried shows, and most publications. You simply can’t go wrong with it. Your jewelry seems to jump off the page, and you can always change the background color, or add a reflection or shadow, with photo-editing software later. Your white background can be as simple as white paper or posterboard; both matte and glossy surfaces work well.
Tip: For shots where you won’t see the horizon (the visible seam where the flat surface meets the wall), you can easily add a slight reflection of your piece to create a nice soft touch. Just place clear glass or a clear acrylic display board on top of your surface, underneath your piece of jewelry. The slight reflection helps “ground” the piece so it doesn’t appear to float.
Black Background
Black backgrounds can be created using any black surface. These are very dramatic photos, and both matte and glossy surfaces work well. You can also use a black acrylic display board with flash photography. However, photos with black backgrounds are sometimes excluded from juried competitions or challenges.
Tip: Be careful that your surface is lint-free, as any tiny speck of dust or lint will show up in your photo. These can be edited out with photo-editing software, but it’s much faster to remove them before you take your photograph.
Reflective Backgrounds
A glossy background creates a reflection of your piece and adds interest to your photo. Reflective backgrounds can be achieved by using the glossy side of an acrylic display board or by covering any surface with glass or clear acrylic. These backgrounds can be combined with gradient backgrounds for a more dramatic effect.
Color Backgrounds
Color backgrounds can be striking and can complement the color of your piece of jewelry. However, the color of the background often reflects onto the metal and distorts the piece’s actual color in your photo, requiring color adjustment of the image with photo-editing software. Due to the color distortion, this usually isn’t the best choice for general jewelry photography. If you want a color background to complement a color theme for your website, it’s easier to change the color of a white background, which also produces a more consistent look for all of your photos.
Gradient Background
Gradient backgrounds are backgrounds which gradually go from a dark side to a lighter side, usually from black to white. Gradient backgrounds can be achieved by either using gradient paper as your background, adjusting the lighting on a dark surface, or by digitally photo-editing an image with a white background. These backgrounds can be combined with a transparent, reflective surface such as glass or clear acrylic over the paper, to add more interest to the image. The advantage of a gradient background is that it suggests a depth of field; often a slight reflection or shadow is added in photo-editing.
Themes or Props in Backgrounds
It’s fun to experiment with themed backgrounds, but if you choose this look for your website photos, choose a theme that can easily be replicated so your images have consistency. Proceed with caution as the photo may be busy and take away from, rather than add to, the concept of your piece. Photos with busy backgrounds or props usually aren’t acceptable for juried show or artist challenge submissions, so don’t rely on them for your core library of photographs.
If you’re using props in your photos just to hold your jewelry in place, consider using putty or polymer clay to invisibly hold your piece instead. If earrings are your challenge, check out my free online tutorial on creating an inexpensive prop box for photographing earrings, where you can also download more information about backgrounds.
Your Next Steps
Once you choose what type of background you want and select your background material, now you need to focus on lighting. Most home lighting emits a yellow cast which will distort the color of your jewelry, so be sure you use bright white lights. Lighting is a much more extensive topic than can be covered in a blog post, but there are lots of wonderful resources online to help.
By Jayne Roth – GUEST BLOGGER
About Jayne Roth: Jayne’s background as a professional graphic artist and art director for major retail corporations, plus her passion for metal clay, led to her interest in helping artists create more professional photographs. She is a metal clay instructor and the owner of Blind Bliss Jewels, which offers photo-editing services as well as metal clay jewelry. Find Jayne in the AMCAW directory, or online at https://www.blindblissjewels.com/photography-tutorials.
This is an op-ed article representing the opinions of the guest blogger, and is not intended to represent AMCAW. Do you have a best practice, interesting idea, tip, or story to share? You could be our next guest blogger! Email us at hello@amcaw.org with a brief description of your proposed blog topic and put “Guest Blog Idea” in your subject line.