Search

Wire-Wrapped Loop – A How-To Guide

Many jewelry artists arrive at metal clay’s doorstep after honing their jewelry skills making beaded pieces. Others start with metal clay, or even metalsmithing, and want to incorporate beading and wire working techniques. This article is for all of these people.

One of the most versatile, elegant, and secure wire techniques is the wire-wrapped loop, also known as the Rosary Link. This artisan-quality technique creates a closed loop that will not come undone, as open loops and jump rings are prone to do. Properly using the wire-wrapped link can raise the level of an artist’s work from craft quality to artisan quality. It can also improve sales, taking an artist’s creations from craft show tables to art gallery or gift shop jewelry cabinets.

Hamilton leaf brooch

The wire-wrapped loop can be used:

  • to securely add a single beaded dangle from a headpin to a simple earring charm,
  • to create glamorous chandelier or waterfall style earrings,
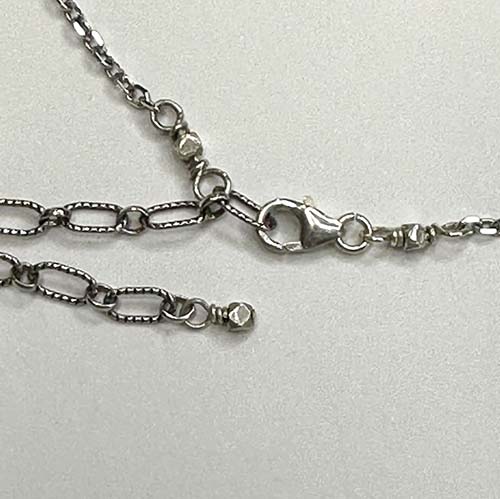
  • to connect a clasp to a chain,
  • to coordinate a series of accents in a flowing beaded chain, such as in a necklace, bracelet, prayer tool, and so much more.

Important Note – one artist’s hands are shown demonstrating the process steps in this article. As all artists’ minds and body mechanics differ, these hand positions are not necessarily ideal for every artist. The important thing to focus on is the desired outcome of the steps, which is showcased in the pictures and stated goals for each step, and becoming able to repeat them consistently over time.Β 

The Five Basic Steps

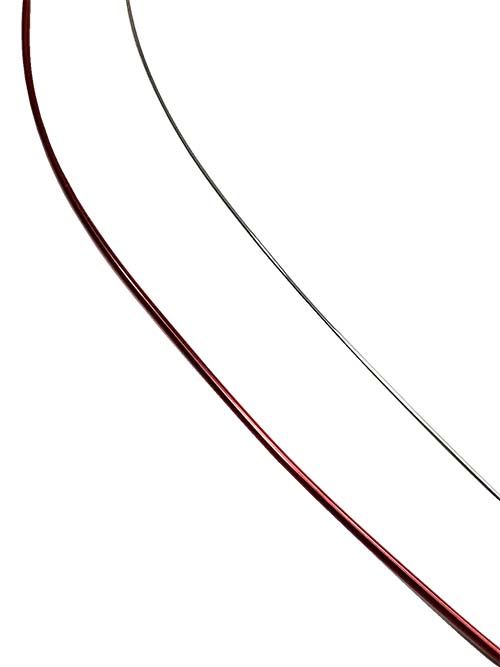
There are five basic steps in creating a wire-wrapped loop and two additional steps needed to create jewelry using this technique. To give a better sense of the visual details of the technique demonstrated here, we first demonstrate using 16-gauge/1.3mm red coated copper craft wire as opposed to jewelry wire. Later in this article, we will transition to jewelry wire, and share several important secrets to success.

NOTE: It is important to use either copper or sterling silver wire to learn this technique. Harder wires, such as steel will cause tool damage. And softer wire, such as fine silver cannot be work-hardened enough to suit the needs of this technique.Β 

To make a sturdy wire-wrapped link that will hold up over time, it is important to start out with round half-hard wire. This is round wire that has been partially work-hardened. To work-harden dead soft wire, and most thinner gauge copper craft wire is sold as soft wire, take two pairs of chain nose pliers and a 1 yard/1m length of wire. Wrap the ends of the wire around the nose of each pair of pliers. Pull hard on the wire by drawing your hands apart until the wire stretches. You should feel the wire give as you pull it. The wire is now work-hardened to the point that it can be used to create a sturdy wire-wrapped link.

NOTE: 16-gauge/1.3mm copper craft wire as used here is very sturdy and sometimes doesn’t need to be work-hardened.

Double Pendant By Paola Mattioli

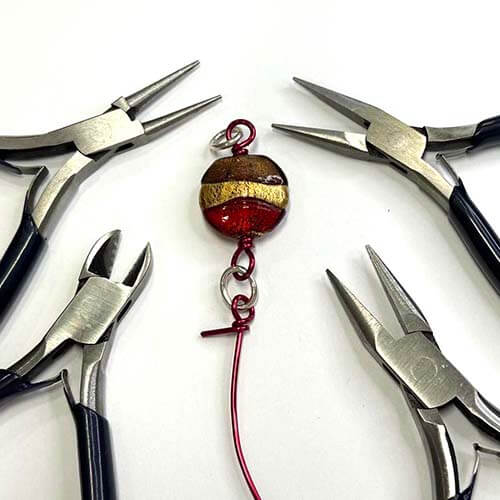
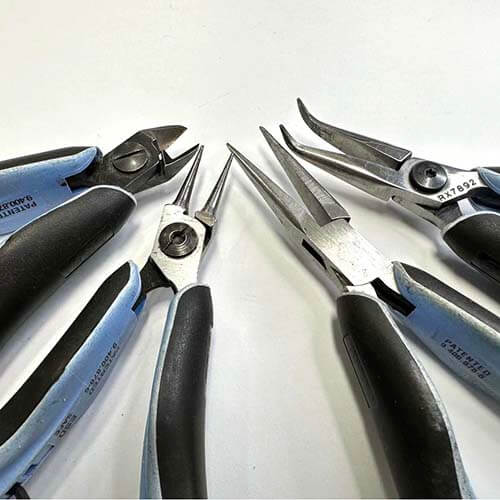
The tools needed to create the wire-wrapped loop are shown here. If you want to become proficient in this technique and use it often in your work, use sturdy, good quality tools. The tools shown in this image were made in Germany. They are designed to move and cut both fine jeweler’s wire and copper craft wire, which is used to demonstrate here. From left to right, the tools are as follows:

  • round nose plier,
  • sturdy wire cutter which can cut up to 14-gauge/1.7mm copper or sterling wire without damaging the tool, and
  • two pairs of chain-nose pliers.

Note that, unlike most household pliers which often have ridged work faces to improve grip, these tools have smooth polished work faces and softened edges. Using smooth and softened tools minimizes marring the wire.

Jewelers generally work from a longer length of wire when creating pieces with a repetitive wire-wrapped link design, allowing them to save wire in the long run. However, in the early learning process it is advisable to work with shorter pieces of wire, one piece for each link. Here, we used 4-inch/10cm long pieces of the 16-gauge/1.3mm copper craft wire. Although much shorter lengths would be needed if using 22-gauge/0.6mm sterling wire, it is recommended that you initially begin with craft wire. This will help to develop a sense of confidence and muscle memory in the early steps rather than working directly with costly sterling silver wire.

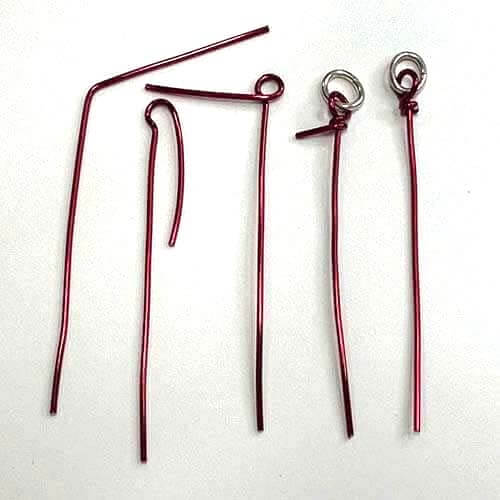
The first five basic steps are shown here and cover only how to create a single wire-wrapped loop. From left to right, the steps are named:

  • boomerang,
  • shepherd’s hook,
  • lollipop,
  • wire-wrap, and
  • nip-and-tuck.Β 
Star Earrings By Paola Mattioli

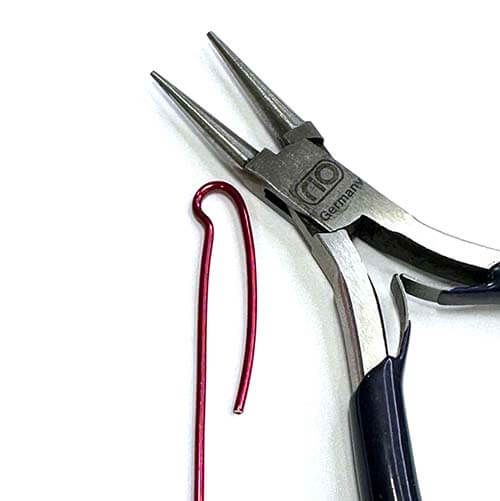
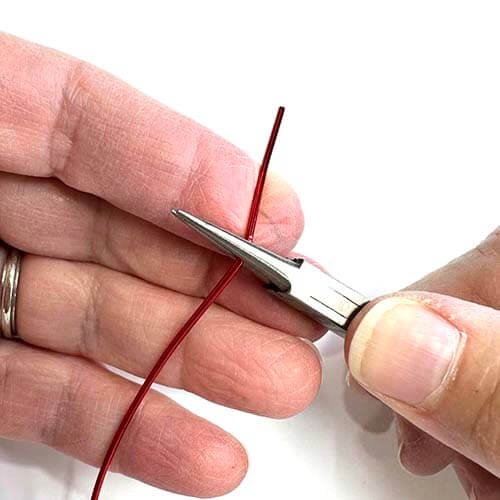
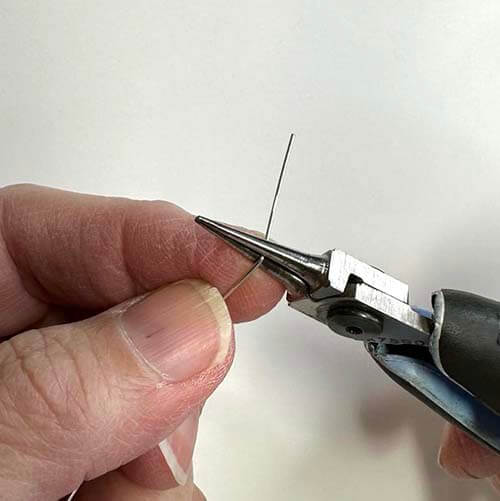
Step 1 – Boomerang – The goal of this step is to create a clean, sharp angle of approximately 105Β°. For this step, it is extremely important to use the tool to move the wire. Avoid moving the wire with the hand that’s not holding the tool. The wire should look somewhat like a very skinny, lopsided boomerang.

  • Starting with a 4-inch-/30cm- long piece of half-hard craft wire, straddle the narrow tip of the round nose plier approximately 1.5-inch/3.7cm from the end of the wire.
  • Support the location of the bend with the index finger of the hand that’s not holding the plier.
  • Use the plier to push the wire toward the supporting finger, creating a tight bend at an approximately 105Β° angle.
What If You Fly? By Annemarie Klappe

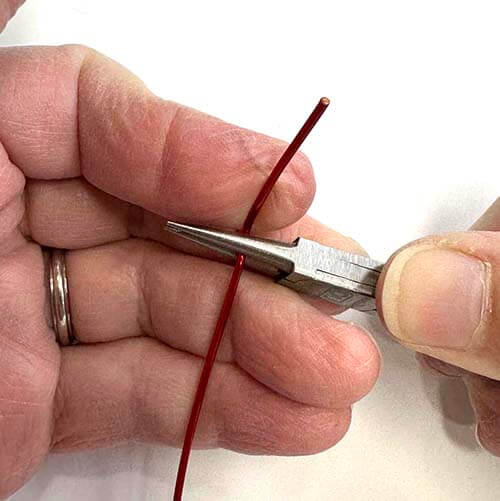
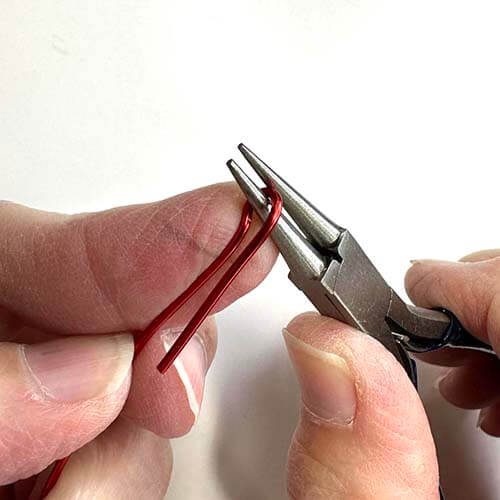
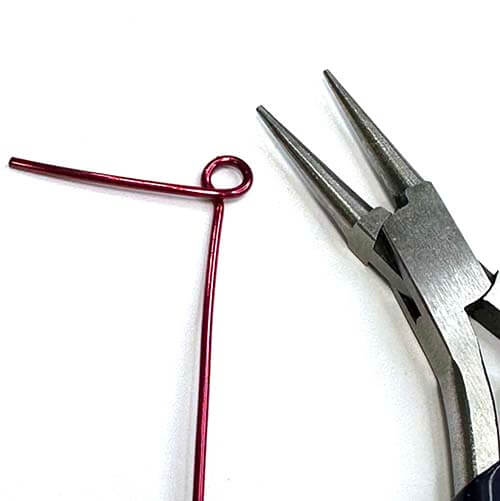
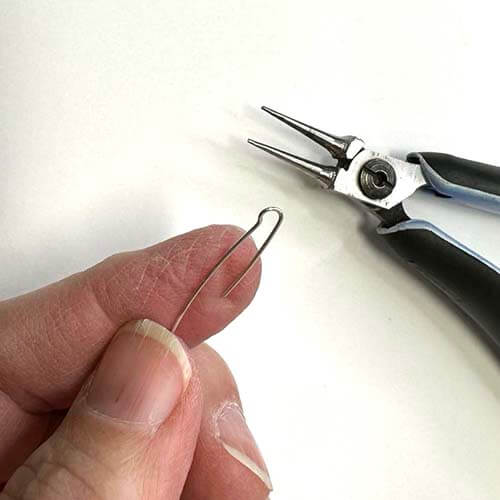
Step 2 – Shepherd’s Hook – The goal of this step is to begin to create the eye of the loop. As opposed to the boomerang step, here the tool remains in a fixed position and the wire is pushed tightly around the tool by the index finger of the artist’s free hand. The inside diameter of the loop is dictated by the placement of the wire on the conical round nose plier. Some projects may require a smaller loop and the angle of the boomerang wire would be placed toward the tip of the plier. Others, such as attaching a wire-wrapped loop directly through the hole of a metal clay charm, will require a larger loop and the wire would be placed closer to the joint of the plier. To create consistent-sized holes, it is often recommended to mark the desired diameter directly on the tool using a fine-tipped permanent marker.

  • The first image shows the intended shape to be achieved by this step. Observe that the boomerang angle created in Step 1 is shown at the top left of the wire, just below the loop.
  • Move the wire along the round nose plier until it rests at the desired diameter of the inner loop.
  • Hold the round nose plier carefully in position and use the index finger of the free hand to tightly wrap the short end of the wire around the plier, creating an open loop.
  • Keep rolling the wire along the stationary plier until the short end of the wire is parallel to the long end of the wire. The finished look is similar to the shape of a shepherd’s hook.Β 
What If You Fly? By Annemarie Klappe

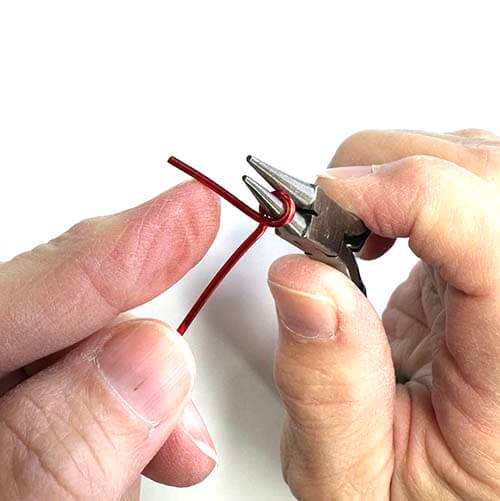
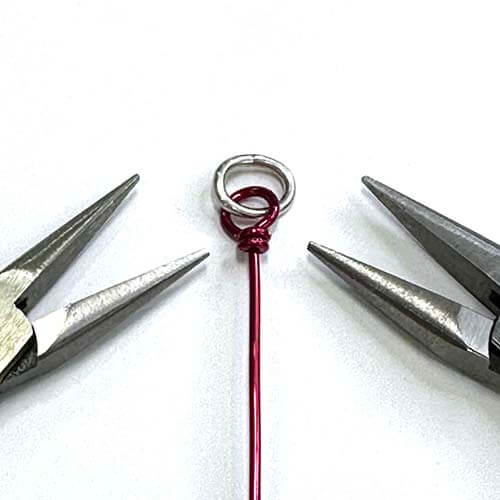
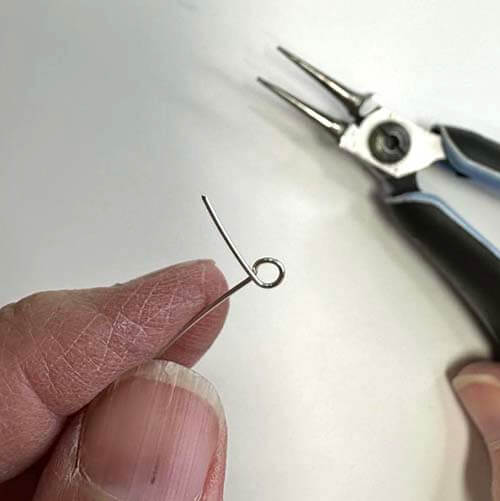
Step 3 – Popsicle – The goal of this step is to pull the short end of the wire across the front of the long end, right at the base of the loop, creating the front of the wire-wrapped link. The loop should resemble a round popsicle on a long stick. The long end of the wire should protrude cleanly below the wire. And the short end of the wire should create a 90Β° angle with the long end of the wire, right at the base of the loop.

  • In the last step of Shepherd’s Hook section, the round-nosed plier was held stationary, and the wire was moved with the free index finger. At that point, the bottom of the plier is blocking the wire from freely moving along the bottom of the loop. So, roll the round nosed plier up so that the index finger of the free hand can continue to tightly roll the wire around the bottom of the loop.
  • Pay close attention to the position of the plier in the second picture here. The bottom of the plier is still in the loop. The top of the plier is above the loop, freeing up access to the bottom of the loop.
  • Use the free index finger to roll the wire along the bottom of the loop and across the front of the long stem. The short stem should complete the circle of the lollipop. The extra wire at the end of the short stem should be at a 90Β° angle to the long stem.

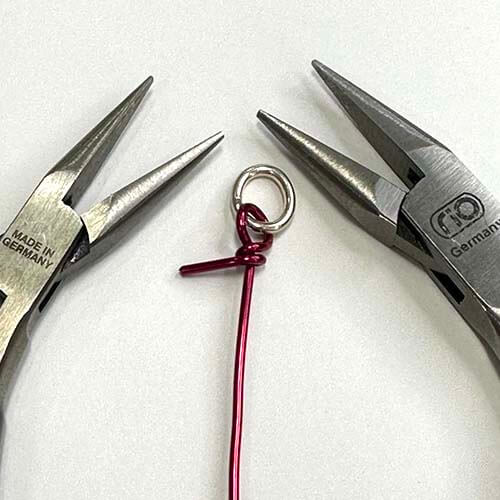
Really Important – If the loop is intended to attach to a closed-loop component at this point, such as a soldered jump ring, a length of chain, a closed earring finding, a charm, or a pendant, now is the time to attach the component. Many times, the component can be added by snapping it in through the still-open loop. Sometimes, if the loop is too snug or the element to be added is somewhat large, the loop may need to be opened up slightly. Use a chain nosed plier to do this, much in the same manner as opening a jump ring, then tighten the loop back down.

Once the loop is wrapped, the only way to attach a closed-loop component is with an open-looped component, such as an open jump ring. This is not a disaster, but using open connections in a wire-wrapped piece defeats the purpose of adding strength by using a wire-wrapped loop.

What If You Fly? By Annemarie Klappe

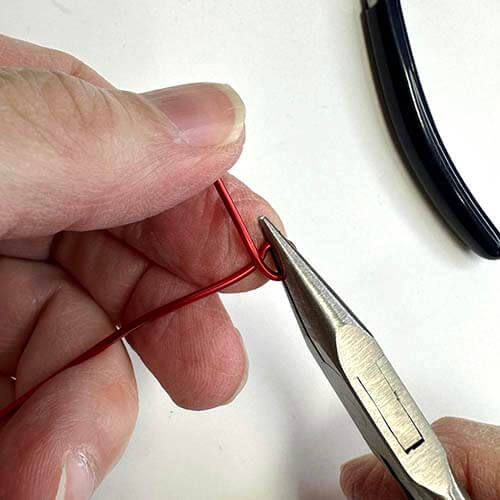
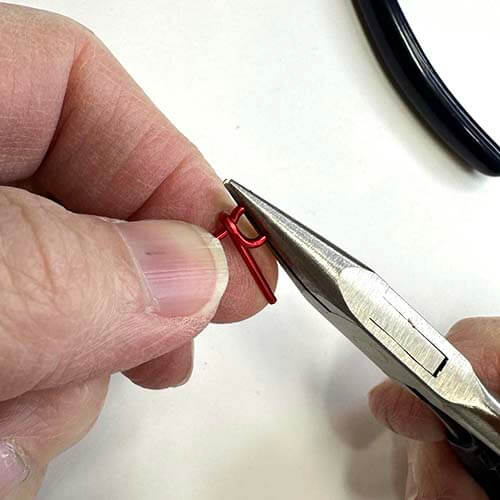
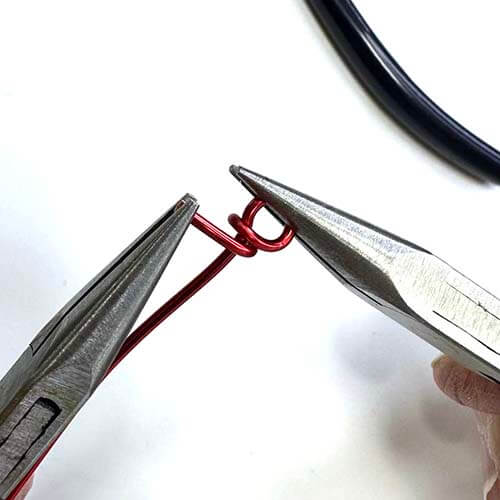
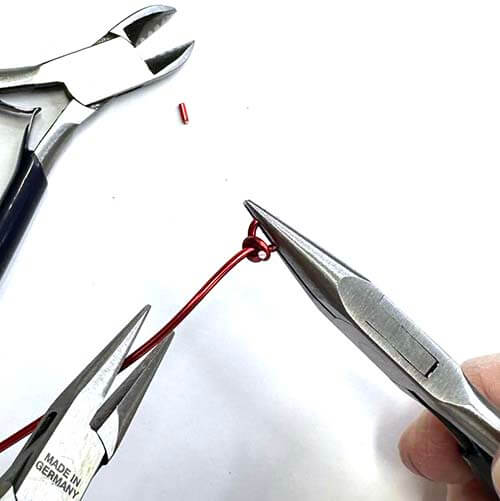
Step 4 – Wire-Wrap – Once any attachments are made as in Step 3, the open loop is now ready to be closed. This step gives the wire-wrapped loop its name. Here, we wrap the wire twice around the bottom of the loop. If you decide the piece calls for more wraps, the length of wire above the boomerang angle would need to be longer.

  • Using a chain nose plier, hold the loop with the short leg of the popsicle facing up, this is the front of the loop.
  • Tightly wrap the short end of the wire around the back of the loop and back around to the front. Usually, this can be done using the thumb and forefinger. Note that the wire is becoming more difficult to move due to work-hardening.

Continue holding the top of the loop with one pair of chain nose pliers. Grab the short end of the loop, which is now much shorter, with the second pair of chain nose pliers and wrap the short wire around to the back of the loop.

What If You Fly? By Annemarie Klappe

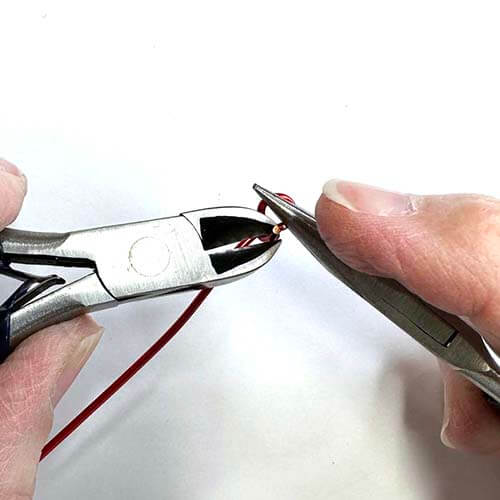
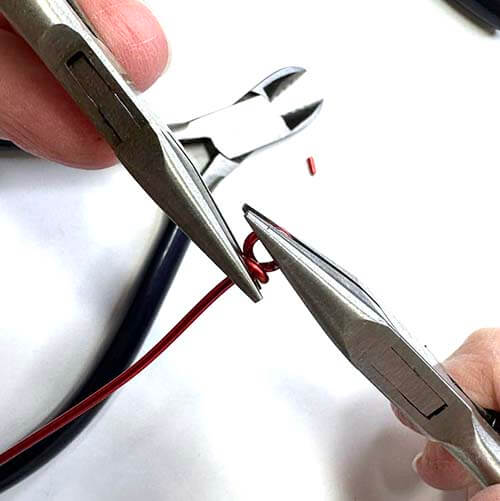
Step 5 – Nip-and-Tuck – In this final step, the short end of the wire, now at the back of the loop, is trimmed and tucked in so that it doesn’t snag during wear. A clean tuck is essential to a high-quality finish.

  • First, hold the wire-wrapped loop with a chain nose plier, with the back of the loop facing up. Place the tip of the index finger of your free hand directly over the short tip of the wire to prevent it from flying when it is cut. Use the tip of a wire cutter to closely snip the extra wire away from the short end of the loop.
  • Continue to hold the wire-wrapped loop with a chain nose plier, with the back of the loop facing up. Using a second chain nose plier, straddle the base of the loop on both sides, front and back.
  • Focus the tip of the second chain nose plier to put pressure specifically on the very short end that has just been cut. Press the end tightly in so that it is tucked at the base of the first wrap. If the end feels rough or snaggy, press it until it feels clean. The wrap should both look and feel smooth.
What If You Fly? By Annemarie Klappe

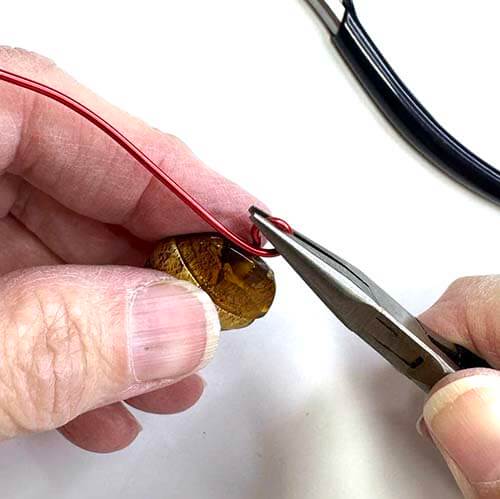
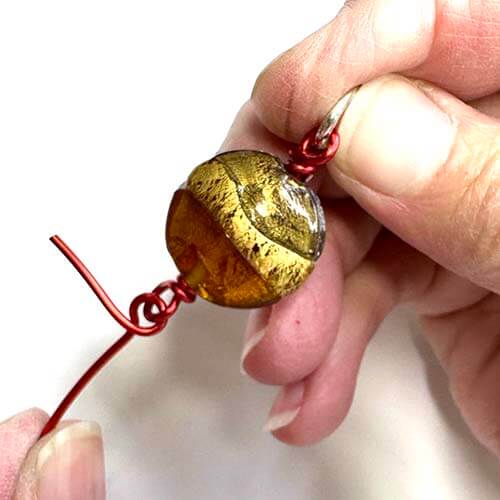
Step 6 – Create the Link – The first five steps complete the wire-wrapped loop but have created only a portion of a link. Let’s add a bead. The goal here is to create a second wire-wrapped loop that is two wire widths above the bead. The two-wire gap allows space for wrapping the wire twice around the bottom of the new loop, matching the top of the loop.

  • Flip the wire over so that the long end is facing up and the top of the wrapped link is facing up, also. This allows both loops to show their fronts on the same side.
  • Add a bead, or a series of beads to the link.
  • Place the tip of the round nose plier two wire widths above the bead.
  • Complete Steps 1-5, remembering to connect the link to a piece of chain or other element between steps 4 and 5, if desired.
What If You Fly? By Annemarie Klappe

Step 7 – Before We Make Jewelry, Some Caveats are in Order – Up until now, this article has focused on just creating the wire-wrapped loop. Now, let’s see where it can take us. First, let’s share some important secrets.

  • Secret 1 – Creating wire-wrapped linked jewelry or rosaries is a repetitive process. If overdone, the work process puts strain on hands and wrists that, if over-repeated, can cause repetitive motion injuries, sometimes resulting in the need for carpal tunnel surgery. Protect your hands. It is important to use good tools and take frequent breaks from the hands-on work process.
  • Secret 2 – As shown in the first image here, some tool manufacturers make ergonomically-designed tools that may reduce the incidence of repetitive motion injuries. These tools are more expensive, but they last a very long time and have helped many to avoid or minimize hand and nerve damage. The particular tools shown here also have smaller tips, allowing the artist to create more precise small loops with cleaner tucked ends.
  • Secret 3 – Always wear eye protection, especially when cutting the short ends of the wire at the end of each wire-wrapped loop.
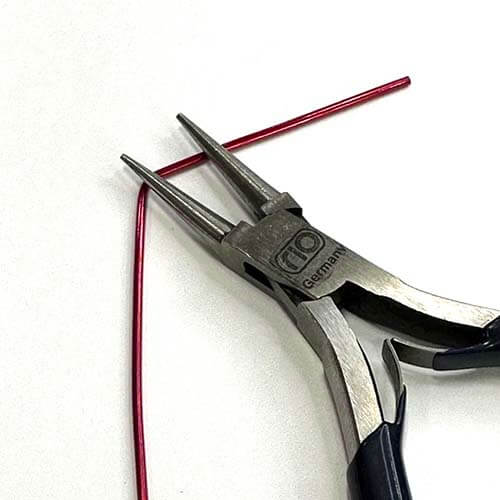
  • Secret 4 – As mentioned earlier, hold the tip of a finger directly over the small end that is cut off of the link in Step 5, Nip-and-Tuck. A flying bit of wire can puncture an eye. A stray bit of wire can embed in a foot, fly into food, or be eaten by a pet.
  • Secret 5 – Some beads can cause problems. If the hole size is very large, and the wire feels much too small for the hole so the bead is not centered on the wire, here’s a tip. Create a wire-wrapped link, add a bead cap, then stack some small tube beads on the wire inside the bead. Add a second bead cap, then complete the wire-wrapping. The tube beads between the wire and the bead will fill up the excess space, stabilize the bead, and disappear into the larger bead.
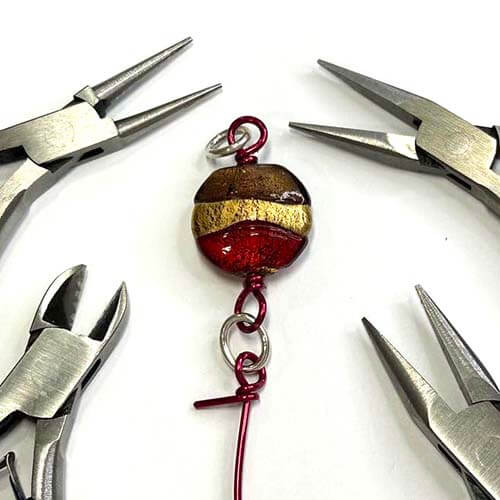
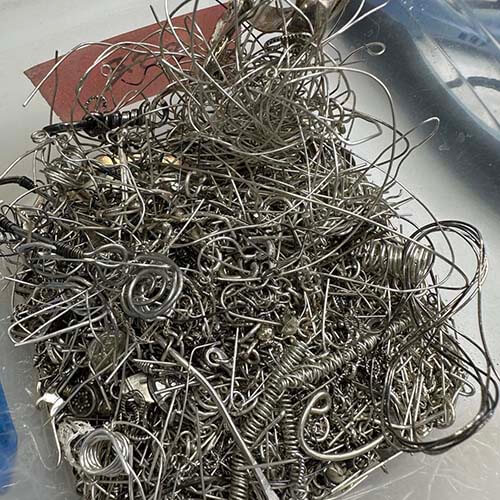
  • Secret 6 – As shown in these images, the steps for creating a wire-wrapped link are the same, whether working in copper craft wire or sterling silver wire. However, the investment is much more significant with sterling. When using sterling silver wire, save the snips that are created during the Nip-and-Tuck steps. These can be added to your silver scraps pot and be redeemed for cash or credit at many jewelry source suppliers or precious metal recyclers.
  • Secret 7 – Many new wire-wrapping enthusiasts are tempted to create bracelets and necklaces using just the wire-wrapped link with no separate joining links in-between them. Although this is possible, this treatment usually results in pieces that are functional, but not fluid, due to the fact that the angles of the connections are fixed. This leaves no wiggle room for the piece to adapt to motion. As a result, pieces tend to kink when they’re used. This can happen with earrings, bracelets, necklaces, and rosaries. As a further result, they may not get worn much.

    How can this be avoided? Compare the following two images. The first shows a second link being directly added to the first, which may cause kinking problems down the road. However, as shown in the second image, adding an occasional small link or section of chain between beaded links or shorter linked sections adds a notable degree of fluidity and ease of wear. This is further discussed in the next section of this article.

What If You Fly? By Annemarie Klappe

Working With Jeweler’s Wire

Double Pendant By Paola Mattioli

The world of beads is quite diverse. Bead quality and type range from materials such as wood, bone, and shell to Amethyst, Sapphire, and even Diamond. The diameter of a bead’s hole also varies but is usually primarily dictated by the hardness of the material. Wooden beads tend to have larger hole because they can. The harder gemstones which are much harder and time-consuming to drill through, tend to have much smaller holes.

Why is this important? The quality of the bead often directs the thickness and type of wire that will be used. The bead’s hole size usually dictates the wire’s thickness or gauge. Some examples to illustrate this concept include:

  • A series of wooden beads with 2mm holes may be wire-wrapped with heavier craft wire.
  • Glass or Amethyst beads with 0.8-1mm holes may be wired with half-hard 22-gauge/0.6mm sterling silver or 14K gold-filled wire.
  • Ruby beads with tiny holes may be wired with half-hard 26-gauge.0.4mm 14K gold-filled or higher-karat gold.


The wire-wrapped loop can be used in all of these circumstances.

Most jewelry supply stores and some bead stores stock round sterling silver wire in various gauges and degrees of softness. For the wire-wrapped loop, the most appropriate wire in terms of function and price point is often half-hard round sterling or half-hard round 14K gold-filled. The gauge of the wire is best dictated by the size of the hole in the stone or bead.

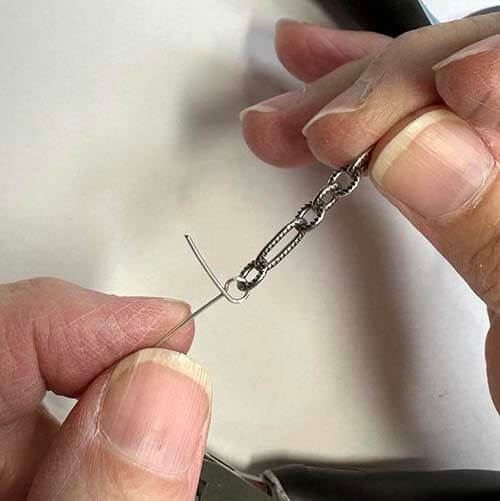
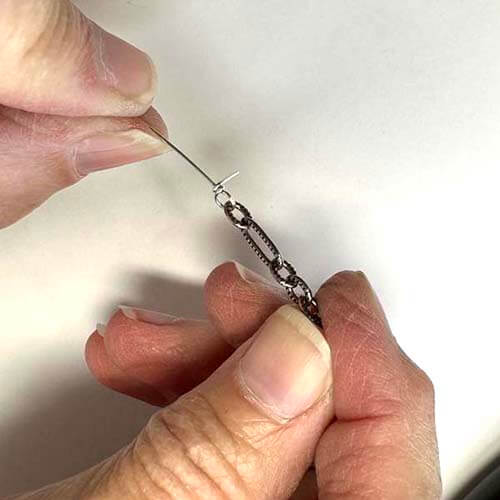
The following images show the beginnings of a simple wire-wrapped necklace and earring set designed with Hematite, sterling silver chain, and half-hard 22-gauge/0.6mm sterling silver round wire.

What If You Fly? By Annemarie Klappe

Note that a different set of tools is shown here. Their handles are much thicker than the German tools shown earlier. This is because they are designed to be more ergonomic. The tips of these tools are also much smaller, making them more precise and able to get into smaller spots. Two faint marks are observable along the tool face of the round nose plier, one about one-quarter of the distance up the cone and the second about two-thirds of the way up the cone. These marks were not made with a permanent marker. Instead, they are indicators of the creation of thousands of boomerang angles and shepherd’s hook positionings.

Steps 1-5 are clearly shown, with a short length of sterling silver link being added between the popsicle and wire-wrapping steps. An extra step has been added after the nip-and-tuck step. The tiny, nipped sterling silver end is somewhere in the hodgepodge of sterling wire that awaits recycling.

A project such as this is a good candidate for practicing the wire-wrapped technique. It takes time and practice to develop the finesse, muscle memory, and confidence that this technique requires. Soon enough, everything comes together, very much like riding a bike.

How Can This Be Used With Metal Clay?

Double Pendant By Paola Mattioli

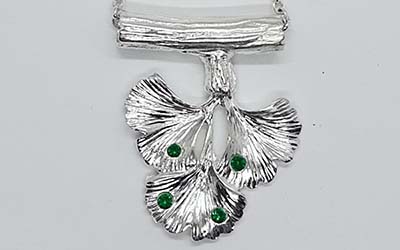
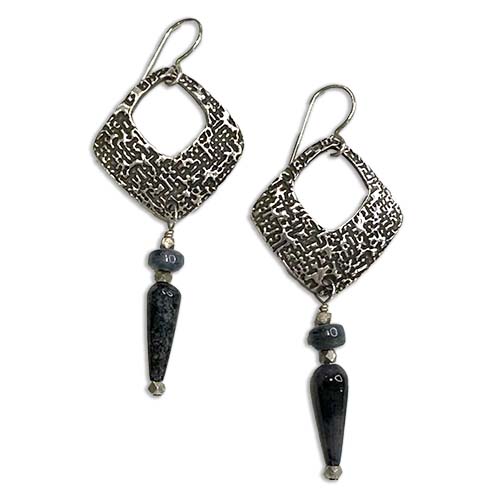
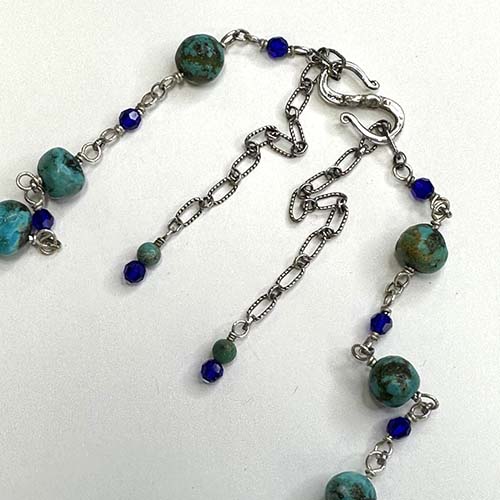
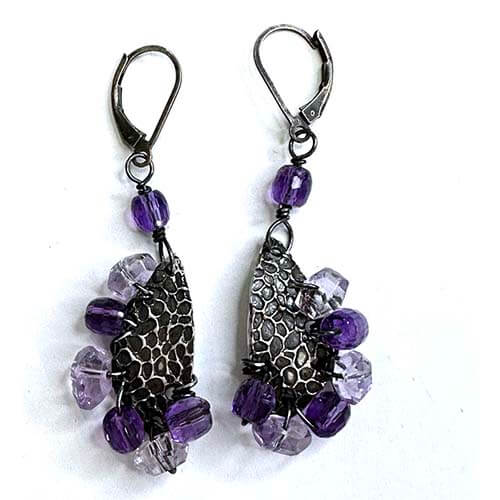
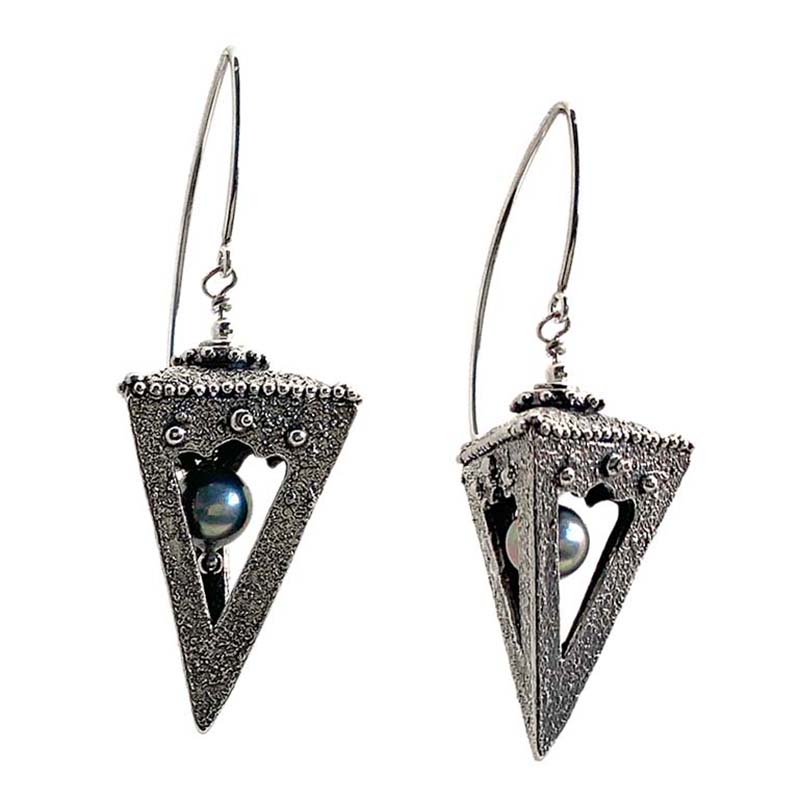
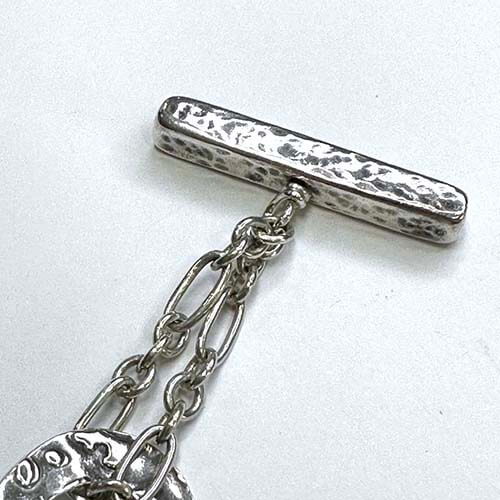
Go back now and quickly review the four jewelry pictures at the beginning of this article. The first and third pictures depict beads attached directly to metal clay creations after firing and finishing. The second and fourth images are of beaded chain sections that grace metal clay designs. In addition, two AMCAW tutorials employ the wire-wrapped loop and are shown in the following images.

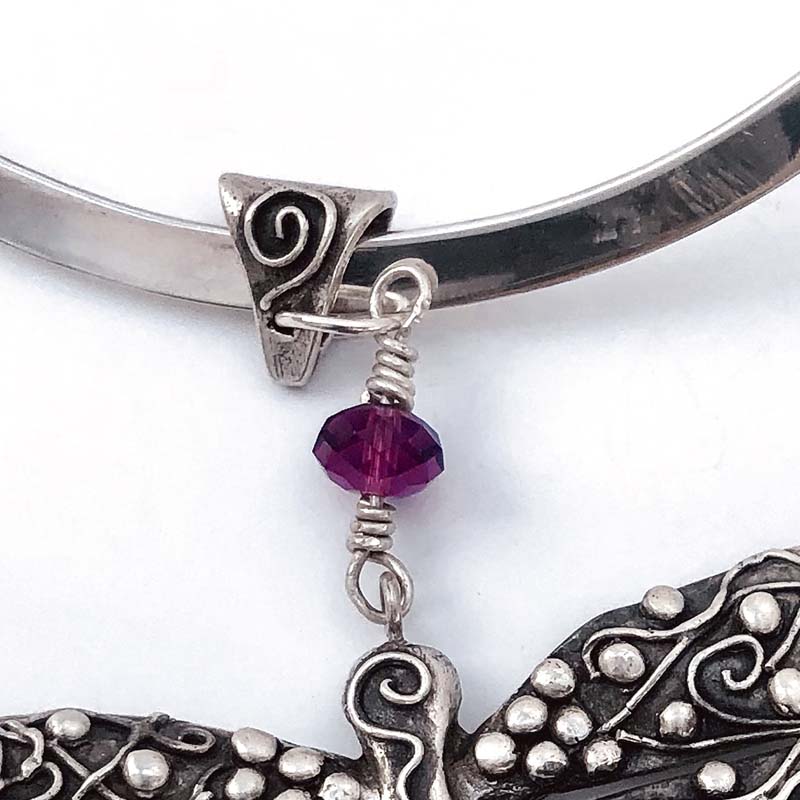
The Amethyst faceted rondelle between the bail and the dragonfly connects to a jump ring at the bail and an embedded eye loop secured in the top of the dragonfly’s head. The artist has used multiple wire wraps in this piece. These extra wraps reflect the syringe detailing in the dragonfly. Dragonfly by Iliana Carrillo.Β 

A simpler beaded wire-wrap treatment transitions between the patinated lever back earring and the beaded charm made from fine silver clay. Note that oxidized sterling silver wire was used here to disappear into the design and not compete with the beads.

Tracey Spurgin Instructor Showcase

The lantern earrings employ the wire-wrapped link technique both inside and outside of each earring. Look inside an earring and find two beads stacked on a sterling silver headpin. There is a small bead at the bottom and a larger bead at the top with a wire-wrapped link securing the beads to the headpin. Then, a section of sterling silver wire is connected to the top of the headpin with another wire-wrapped link. The free end of the wire, with the beaded headpin trailing it, is threaded through the aperture in the side of the lantern, then through a hole in the top of the earring, eventually appearing above the lantern. Here, another wire-wrapped loop is created, securing both the dangle to the inside of the lantern and the lantern to the French hook. Lantern Earrings by Tracey Spurgin

The final picture is of a toggle bar, connected by sterling silver chain to the link of a bracelet. Both the toggle bar and all of the links in the bracelet are created from fine silver clay. The toggle bar fits into the hole of the last link in the bracelet, completing the clasp. Look right between the chain and the toggle bar. The bar is connected to the chain by a length of 18-gauge/1.2mm sterling silver wire. One end of the wire has been riveted to fit in a hole drilled through the bar. The other end is a wire-wrapped loop, which runs through both ends of the length of chain.Β 

Tracey Spurgin Instructor Showcase
Could the wire-wrapped loop be the missing link to your future?
Privacy Overview

This website uses cookies so that we can provide you with the best user experience possible.

Cookie information is stored in your browser and performs functions such as recognizing you when you return to our website. For example if you like to save your username and password when logging into your member account then this is saved as a cookie.

We use Google Analytics to track what pages you visit to help us better understand what is of interest to our visitors. This is collected from your IP address, which locates you within an area and doesn't contain any personal information about you. If you want to see more information about your IP address click here to find your IP and click here to find out what your IP address shows about you.

Our membership services are through Membershipworks and they use cookies to provide the service to you. These cookies are necessary and essential to the workings of the website when you are logged in. They cannot be turned off as the website would not function correctly without them.

See our full Privacy and Cookie Policy here