


I created a special gift for a very good friend, inspired by one of AMCAW’s 20-Gram Tutorials. Before I get to that, here is a little bit about my metal clay journey.
 I was born naturally creative, expressing this through many crafts. My career as an occupational therapist reinforced the importance of activity for well-being. This, combined with my natural love of making things, has meant craft has always been central to my life. Since retiring I have had the opportunity to spend my time doing things I love and that has naturally led to an explosion of creativity!
I started my metal clay adventure in 2017. November 2016 found me unable to sleep, watching a craft channel where someone was demonstrating metal clay; it was 11:30 pm! I was instantly hooked, and my children clubbed together to get me started and the rest is history. I did my certification course in PMC in 2017/18. I am fortunate to live near a community of small workshops and have been able to rent some space there.
I met the friend I made this book for about 10 years ago and we met regularly for coffee. She was fascinated when I started making jewellery and always eager to see what I had made. She was very supportive and interested, she asked to buy a few pieces at one meeting and she has continued to buy from me regularly ever since. She genuinely loves my work which I find very humbling. It took me a while to realise that she has become a collector as she rarely wears it in case she loses it!
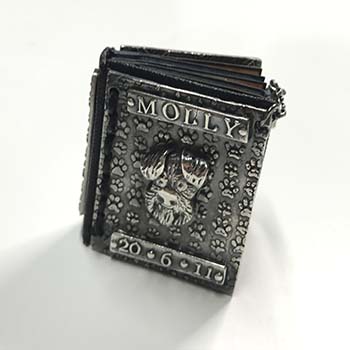
So when her 70th birthday was on the horizon, I wanted to make her something very special. I decided to make her a silver book and I wanted to include some journal pages as a tribute to her two Schnauzers, Molly and Betty. It needed to stay small due to the silver content of the front page. I am not a natural planner when making things so the book evolved as it went along.
Making the Book
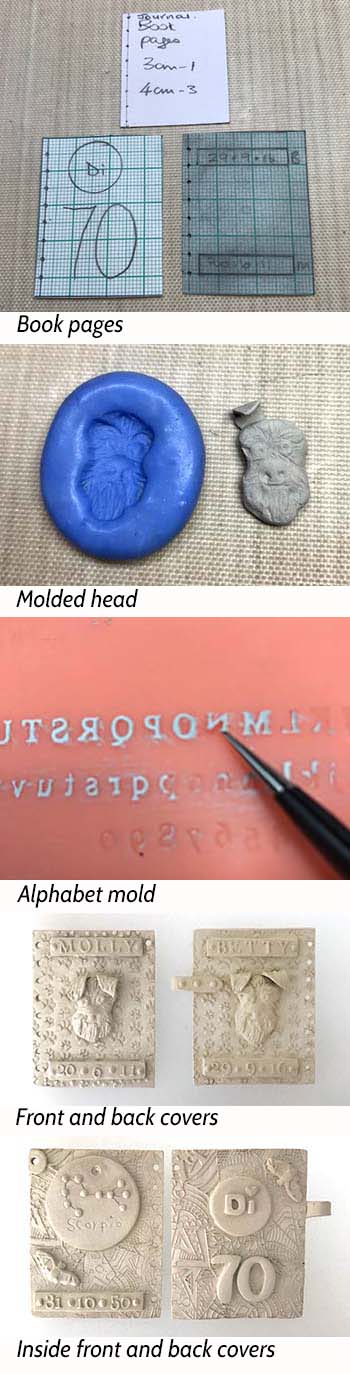 The book is made from Art Clay. The pages unfired were 3.5cm x 4.5cm. I drew them up on graph paper and measured the holes at 0.5cm, intending to fasten them with jump rings, but the book grew too big!
I made a rough shape the size I wanted of a Schnauzer head in metal clay, and then carved it following photographs. Once happy with that, I made a mold from a silicon molding compound. I decided to add the ears separately to add some individuality.
Finishing Touches alphabets had just been released and were perfect for creating names and dates.
The front and back cover were designed with the dogs’ faces in the centre, and their name and date of birth on the top and bottom. I used a tiny paw print texture which was perfect.
I wanted the inside of each cover page to be for Di. I used her star sign, birthstone, and her date of birth on the front cover, and her name and age on the back. I found a good weblike texture and a tiny bat as she was born on Halloween.
I looked for star signs which were linear and was able to reduce them in size, copying the shape. I highlighted the star points with tiny dots and a scriber to create the lines between. I found the letters and numbers to be very fragile: they require patience, persistence, and practice! I had to replace one or two but by the end it was easier.
Firing proved to be a challenge as I had not thought through the gravity issues and fired the dogs face up…. big mistake… especially as there was a lot on the reverse. The front page was a bit warped but largely OK but the back pretty much folded in half! I don’t have pictures as I was too intent on sorting it out! I wish I had taken some, as it was very dramatic and I thought it was ‘terminal.’
I had to hammer them flattish with a plastic ended hammer. I managed to break the corner off the back page and knock off the connector which holds the book together. I am pleased to say I am now getting better at recovering broken clay, and use Clay Stay which is great mixed with paste for helping to mend fired and unfired clay. The front and back remained a little warped but the journal pages acted as a support to the silver and prevented silver rubbing on silver. The silver pages then had a patina added and were polished back.
Making the Inside Pages
I found a company that will produce photos from one image with many on one page getting increasingly smaller.
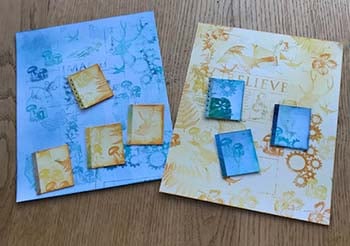 I hand-coloured a blue and a yellow page with inks and then cut them to size. Each page was reinforced with a 2mm strip of card for the holes. The pages were decorated with tiny photos of each dog, some pockets, facts, and phrases. To complete the journal pages, I made a front and back cover and a spine covered in buckram which is very thin but very strong. I bought a metal hole punch which made nice neat holes in all the pages. I then stitched the outer silver pages to the inner book using strong leather thread. I was pleased with the result. It needed to be worked a bit in order to open flat.
This was a labor of love and involved much problem solving, but Di was so happy with this very personal gift that it made it all worthwhile.
Guest Blog: Hilary Thorogood
Hilary has been a metal clay artist since 2017. She retired from a career in mental health as an Occupational therapist in 2015 to pursue her long affair with anything crafty. She lives with her husband Jeff and has three daughters and between them they have nine grandchildren. She had just started running workshops before lockdown and sells her jewellery through a local artisan shop.