


Joy Wignall is the co-winner of the first Bits and Pieces Challenge in August. She shares the story of how she tackled the challenge, developed her winning piece, and what she learned along the way.
“What a great idea for a monthly challenge!” was my initial thought when I spotted the posts about the new Bits and Pieces Challenge on Facebook. I always enjoy a challenge and to consider five different elements and a theme really focuses the mind. Well, that’s what it’s supposed to do, except for me (going in all guns blazing) I didn’t see the theme to begin with – doh!
 I am not usually one for putting things on paper first, rather I develop an idea in my head then see what the clay wants to do, figuring it out as I go. When I first spotted the challenge, I decided I would use it to create the bracelet idea I had been thinking about recently.
The five elements for the August challenge were three fire-in-place stones, metal clay ball embellishments, embeddable eyelet(s), something to add movement, and a piece of ribbon or braid for texture or used in the design. One important piece of information that escaped me to begin with was that the theme was Summer.
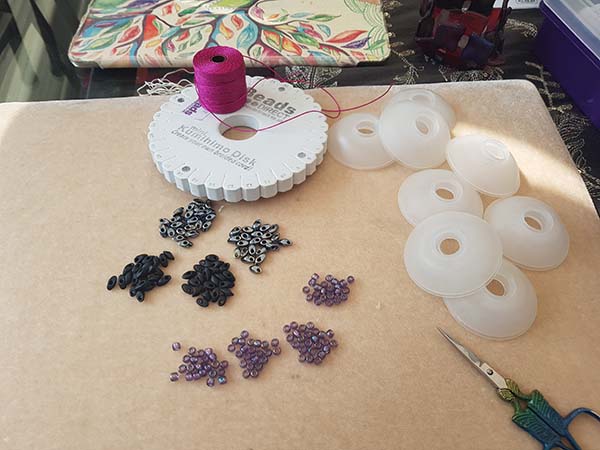
To start the challenge I decided that as I didn’t have any ribbon or braid, and I didn’t want to go out shopping for any I would create my own kumihimo braid; if it’s strong enough for Japanese samurai to lace their armour, then it’s strong enough for a bracelet! I planned to create a braid to hold a bead in the centre of the bracelet, which would spin, creating the movement part of the challenge.
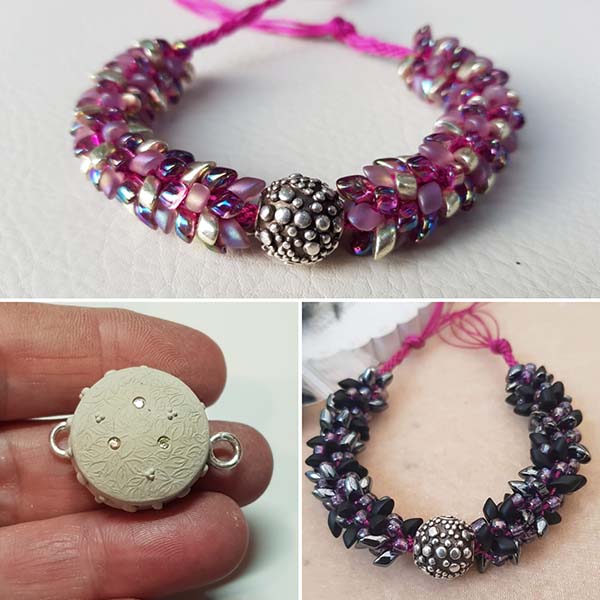
So after deciding on the colours, I began creating the bracelet braid and created a very textured spiky type of braid, created by threading magatama beads in different directions to create the rough spiky texture. The beads I chose were also very dark, matte black and shiny gunmetal colour on a lovely magenta coloured cord.
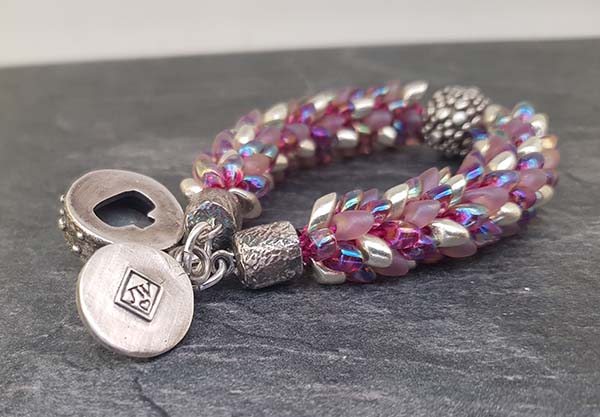
I already had an undecorated spherical bead in my silver stash, so I embellished it with lots of tiny balls, spots and dots, and fired and patinated it ready for threading onto the braid. It was looking good, even if I say so myself, just what I had in mind when I started. Now to create the cord ends and clasp.
 It was only then I spotted the theme was summer. The spiky dark colours were definitely not representative of summer, so back to the bead board. This time I threaded the beads on all facing the same way to create a smooth texture. With the beads all sitting away from the centre bead, it creates a look of the silver bead being held or hugged. The colour palette this time was based around summer flower colours, still using the magenta cord. I have kept all the spiky dark coloured beads ready to create a winter one for those of you who were wondering.
I haven’t created cord ends before. One of the reasons I stopped making kumihimo braids was that I couldn’t find the cord ends I wanted, they all seemed to be either too big or too small. Who knew that making your own would be so rewarding? Made to just the right size for the piece of work you are making is definitely the way forward. It was so straightforward to create as well: wrapping a piece of clay around a piece of plastic straw, sealing the edges, cutting it to the length I wanted when dry, topping it with a small circle of clay and embedding an eyelet in each one.
I haven’t ever used embeddable eyelets before either. They were so easy to use and they have created a really strong bond as they are pushed through the clay instead of sticking part of a donut shape on top of the clay.
So far so good: we have braid, balls, movement, eyelets and theme (summer just in case you missed it). Now to use the three fire-in-place stones. I had wanted to try the twist and lock box clasp, as seen in a metal clay book printed in 2008 for a while, but to be honest I couldn’t quite follow what the author was saying. I decided to bite the bullet and go for it. I have to say the finished clasp is rather clunky and there is definitely room for improvement, but I know what to try next time to try and improve my work. Again, the embeddable eyelets were used for the clasp, creating a very strong connection, which of course a bracelet needs. A few tiny balls and the three fire-in-place stones were used for the clasp, so now all the elements of the challenge were complete.
Once it was all fired, polished and patinated it was just a matter of putting it all together and wearing the bracelet with pride. Challenge complete!
 Thank you all for following my little bit of information on the process of undertaking the challenge, it was great fun and although I said earlier that I don’t usually plan things on paper I have to admit that when I decided to take the September challenge I wrote the theme and the elements down before I started so I would not have an excuse to miss any part of it!
Thanks to AMCAW for the challenge, and to the jurors for their valued comments on the piece. I totally agree the three stones would have looked better if they were in a colour to match the bracelet as the plain ones are a little lost, but then again the clasp can be used in future projects as it is interchangeable with only two jump rings to open and close for it to go on another piece.
I very much look forward to seeing what YOU create for the next monthly Bits and Pieces Challenge!
Guest Blog: Joy Wignall