Introduction to Base Metal Clay
A Brief History of Base Metal Clay
Back in the early 1990s, metal clay was developed, first at Mitsubishi and then at Aida, and became available by the late 1990s to the general public. At first, these malleable clays were only available in precious metals: silver and gold. As time went on, several people started experimenting with some of the base metals to keep the cost of using clays down.
Base metal clays were generally considered impossible to create in the early days. Even more, bronze (an alloy of copper and tin) was not considered at all since most people thought that only pure elements would be able to be used as metal clays. Bill Struve, a research chemist in North Carolina, created the first bronze clay in the mid-2000s. After testing, retesting, and experimenting by several metal clay users, most notably Celie Fago, the trademarked BRONZclay became available in the US. Soon COPPRclay followed and then FASTfire BRONZclay. In the last twelve years, many base metal clays have burst onto the market. Nowadays clays can be found from all over the world, including Australia, Turkey, Poland, Japan, and the United States. Not only bronze and copper are available, now one can find brass, iron, and steel as well.
The Science
Base metal clays, as with precious metal clays, “work” by sintering just under the melting temperature. Silver fires so easily, just on an open shelf, but base metals need to be fired in an atmosphere that eliminates oxygen from interacting with the firing process.
Through years of experimentation, a two-stage firing, with the first burning out the binder and the second sintering the clay, was developed. Generally, base metal pieces are covered in activated charcoal, which binds the oxygen molecules and eliminates firescale.
methods include torch firing, open shelf firing, and single-stage firing. Theoretically, all base metal clays will fire with these three methods. However, in practice, a two-stage kiln firing will give the best and most easily replicated results. Each will be explained in the section on firing.

Mixed Media Tutorial Collection (members only)
Summer Walks Trinket Bowl By Lori Ridgway
Working with Base Clays
How are base metal clays worked? Generally, there are few differences from working silver metal clay. Rollers, brushes, a work surface, cutters and knives, and textures are all part of the tool kit a metal clay artist will develop.
Any tool that can be washed can be used with either fine or base metal clays; however, care should be taken to not cross-contaminate. Tools like sandpaper and sanding pads or nail boards should be dedicated to each type of clay. Many people use a different brush and water container for silver and for base metals to recycle the silver at some point.
One particular issue that is different with base metals and fine metals is the ease of attachment. With silver, sometimes using only water or slip is required to attach pieces. Bronze and copper require a firm hold to the connected pieces for at least a minute to ensure a secure bond.

Rodica Frunze letter opener
Kiln Firing Base Clay
The most common practice for firing base metal clays is a two-stage firing using first an open shelf and then covered in activated charcoal inside a stainless steel or ceramic container placed in a kiln. Each manufacturer is a little bit different in their firing schedules, but they can be boiled down to a simple formula.
First firing (open shelf)
This is similar to the way silver is fired, pieces laid out without touching and fired with a slow ramp to between 650˚F /343˚C and 900˚F /482˚C, with a short hold, perhaps 30 minutes. Let the pieces cool before handling. The object of this firing is to burn off the binder in the clay. Pieces are fragile after this firing and should be transferred with great care to the carbon for the second firing. Note: pieces will catch on fire during this process. Do not open the kiln door.
Second firing (carbon)
Place approximately an inch in the bottom of the container. Gently place pieces from the first firing on the carbon, nestling pieces like lentils or domed pieces so that they are supported. Sift carbon over the top of the pieces until they are covered by about an inch. Place the lid on the firing container and place it in the kiln elevated on feet so that air can circulate around the container. Make sure the thermocouple is not touching the box. Ramp and hold according to instructions to the top temperature specified with that brand of clay and let cool in the carbon down to room temperature. The carbon binds the oxygen molecules, remember, so pulling pieces out before cooling will allow oxygen to start firescale. Note: the carbon catches on fire as well, be careful not to open the kiln door during the firing process.
Alternative Methods of Firing
Open Shelf Kiln Firing
This technique uses either the firing shelf or a stainless mesh grid, elevated slightly in the kiln to enable heat to circulate freely. Generally, one piece of clay at a time can be successful. Care must be taken to ensure safety since the shelf is placed in a hot (1500˚F / 815˚C – 1800˚F /982˚C) kiln, and then timed much in the same way as enameling. Remove quickly and dump the piece into a container of water to quench. Most of the firescale will pop off at the moment of quenching.
Single Stage Carbon Firing
This is the original technique for firing the earliest bronze clays. One problem is that the binder does not have a chance to burn off completely while covered with charcoal. Several one-fire clays are currently on the market, which include instructions for ramping to particular temperatures, holding, then continuing to ramp to higher temperatures. The advantage is that the container is only touched once, disadvantages include that not as much clay can be successfully fired at one time.
Torch Firing
Some clays come with instructions for this technique. A good deal of practice is required to be consistently successful, however, the size and shape of pieces are limited. Some clays do suggest using a torch to burn off the binder. This is much quicker than the open shelf method but does require some patience or pieces can be fired too far into the process.
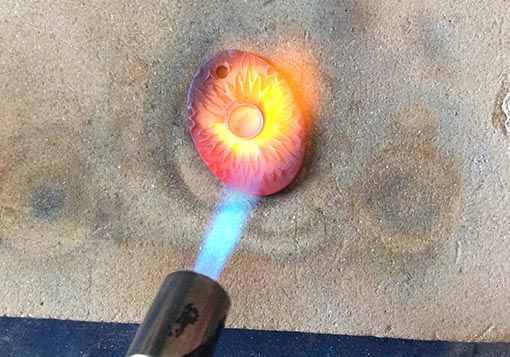
Firing with a torch and heatproof block
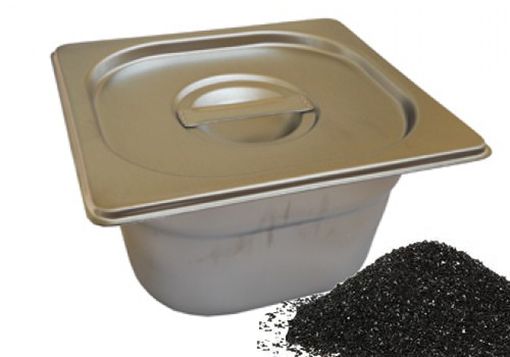
Steel container and carbon for kiln firing
Testing
So, are the pieces truly sintered? After firing, pieces should be smaller than the original clay pieces. Pieces make a metallic sound if the piece is tapped against another piece of metal. Some base metal clays are not meant to be dapped, but generally, bronzes and coppers can be dapped. There is even a pair of pliers available to use to bend pieces for testing.
If bending is undesirable, try the water drop test. Simply mix a drop of dish soap with ½ cup water, and then place a drop on the surface of the fired piece. If it is completely sintered the drop will not be absorbed.
The dish soap acts as a surfactant and lets the water wet the metal, otherwise, it will bead up even if the metal is porous or not sintered. If it is sucked into the piece, it is not fully sintered and needs to be refired in charcoal with an increased temperature and/or an extended firing time.
Troubleshooting
Sometimes pieces don’t sinter. Here are some ideas:
- Start by making test strips. These can be simple textured strips that will become dangly earrings, so time and clay are not wasted. This way pieces can be refired as necessary and a whole container full of pieces is not ruined.
- Try to fire no more than 100 grams of clay at one time. Too much can overburden the charcoal and make it not bind all the oxygen.
- Sometimes all it takes is to slow down the ramp in the second firing, and perhaps extend the hold time. Speed is not a virtue here.
- If the pieces are bubbled, either they were not completely dried, or the temperature is too hot. Try backing down a few degrees in the second firing.
- If the pieces crack, or break while you are handling them, they are not fired hot enough. Try adding a few degrees at a time in the second firing.
- Sometimes pieces break while transferring from the first firing to the carbon stage. One way to avoid this is to use the top surface of the carbon as a shelf, do the first firing, and then when cool add more carbon and continue with the second firing.
- Sometimes the clay gets too dry and is hard to use. One solution is to form a little humidor out of a sealable container, plastic wrap, and a damp sponge. Use the wrap to make a little bowl and set it on top of the sponge in the container before putting on the lid. Be sure the clay does not contact the sponge directly otherwise some nice mud will be formed.
- Charcoal can be reused eight to ten times before tossing. If it has too many fine pieces, it can be sifted outside (be careful of inhaling particulates and always wear a mask) and a magnet can be used to drag out pieces of steel that have flaked off the firing container.
- When opening a new pack of clay, break or cut into 10-15 gram sized chunks and knead to make sure the moisture is evenly distributed. Do this every time the clay is used, no matter how long it has been mixed up or if it came in clay form.
- As a purely anecdotal evaluation, keeping clay humidors in the refrigerator seems to aid in the workability of the base metal clays.
Finishing Techniques
Polishing
The first thing needed after removing base metals from the carbon firing box is simply washing the dust and carbon away. That carbon is dirty stuff and can easily mess up your tumbler. Some people will prefer to use a steel brush with soap to clean their pieces, others may just need to run water over them before putting them into the tumbler. Sometimes small bits of carbon can get stuck in a heavily textured area of the design and will need to be removed; a needle tool, tweezers, or another type of pointy tool will usually do the job. The steel brush can help here too. Just make sure all those carbon bits are gone before placing the pieces in the tumbler.
There are commercial burnishing formulas on the market for tumbler use, however, some will use a couple of drops of a good degreaser detergent instead. Do not use too much of either. The action of the tumbler will polish the surface of the pieces but technically will not work-harden. Most bronzes are very dense and will take several hours to overnight to polish well. Stainless steel shot in various shapes is available for use in rotary tumblers. Using all those different shapes gets into all the nooks and crannies of textures with ease. Although carbon steel shot is available and is cheaper, it will rust without proper care. The rust will pit jewelry pieces that are tumbled with the shot. Magnetic tumblers are another type of finishing tool. It typically only has pointed pins and burnishes work faster. All tumblers should be rinsed and left to dry when finished.
If a tumbler is not available, a steel brush and some sort of soap or detergent can be used to polish each piece. This takes a good deal of time and generally works best for larger pieces so there is something to hold to while brushing. A steel burnisher (for bronze) or agate burnisher (for copper, which is much softer) can also be used instead of, or alongside, a brush especially to highlight raised areas in the design.

Clément Marquaire Golden Bronze Clay Cuff

Cindy Pope, Cuff

Paula McDowell, Momento (copper)

Kate Qualley Peterson, pendant
Color
After polishing, there is a decision to be made about patina, adding color, and sealing the finished result. Not all of these are necessary: this is an area of personal taste and style. Patinas work by adding darkness to the metal. Liver of sulfur is one of the most common patinas and is readily available from most jewelry and metal clay suppliers. It comes in several forms: gravel, gel, and liquid. Liquid only has a short lifespan and gel lasts a good while. A small container of gravel can last a long time since only one pea-sized piece is used at a time. To make a solution, completely mix that pea-sized piece with a cup of warm water, then dunk a piece of jewelry and promptly dunk into clean water to rinse, then decide if there is enough patina. If not, dunk and rinse and repeat until the desired patina is reached. Many people have their own “recipes” for liver of sulfur, including adding salt or ammonia, which can slow down the process and perhaps give a gradient of color as well. This takes experimentation; keeping records will allow repeated desirable results. After the patina is applied, many go back to the burnisher to bring up shiny high spots, creating more contrast.
Color may be added to the metal in many ways, notably using colored pencils, alcohol inks, and gilders paste as well as enameling. Copper especially is easily enameled but must be exceptionally clean after firing for the enamels to “take”. Ancient bronzes show the use of enamel, although this is beyond the scope of beginner work. Again, experimentation is the key.
Pencils, inks, and gilders paste are all applied to either the entire piece or select areas of the design and work best if used in recessed areas. The burnisher again will call up the metal color on high areas to contrast with the colored areas. For extended use, and especially if the piece receives a lot of wear, consider a sealant to maintain color.
Sealants can be brushed on, sprayed on, or rubbed on. Some people do not apply any sealant at all and prefer to let the metal “age” or weather in place. Conversely, some people’s body chemistry will not allow them to wear base metals directly next to their skin. In this case, a sealant may be used. Most sealants will darken the base metal, so a beautiful kiln patina may not be quite so beautiful after being sealed. Like a coat of paint on the walls, sealants can wear out over time, especially if the jewelry piece receives lots of wear, for example, a ring. Drop earrings on the other hand do not normally touch the skin and seldom need to be resealed under normal wear.