Search

Metal Clay and Wire

For many of us, our first foray into jewelry design fell under one of several categories:

  • beading,
  • wirework,
  • metalsmithing,
  • or maybe even metal clay.

Wirework has the unique ability to capture, combine, and connect all these design methods, greatly expanding your jewelry design options.

All kinds of wire will be covered in this article including fine silver round wire and bezel wire, Sterling silver wire, Argentium wire, copper wire, Sterling silver headpins, Sterling silver rivets, flex wire and more.

This article gives an overview of several techniques for incorporating wire into metal clay pieces, breaking the categories into options for adding wire pre-firing, mid-firing, and post-firing. There are many additional resources in the AMCAW Learning Center and the member only tutorials that will help you find out more detailed information for many of the techniques referenced here.

There are some important guidelines to follow when you are considering adding wire into your unfired silver metal clay piece. One is absolutely key when you are working with silver clay as it informs your design process even before you put pencil to paper. It is tempting to think that incorporating sterling silver wire will strengthen your piece and this is true, but only to a point. It is possible to safely add sterling wire to silver clay up to 1300°F/705°C if you plan to fire for less than an hour.

However, under the high-temperature/long-hold kiln-firing conditions common for many silver clays, sterling silver wire undergoes a structural change. It begins to melt from the inside out. Although the wire may look strong after firing, it has degraded internally, becoming very brittle, and can easily break when any twisting, bending, or shaping force is applied. This problem is solved by substituting fine silver wire and elements in place of sterling. Embedding Metal In Metal Clay is an excellent article in AMCAW’s Learning Center Resources that addresses this topic in more depth.

Adding sterling wire or other elements post-firing is an excellent option. You can solder, wire-wrap, or twist away to your heart’s content and embellish your pieces with colored beads and even colored craft wire.

Wire and Unfired Metal Clay

Metal Clay and Beads, 1B, Sylvia Q. Sierra, photo: Sylvia Q. Sierra

Setting a Half-Drilled Pearl in Fine Silver or Sterling Silver Clay

The hole in most half-drilled pearls fits perfectly over 20-gauge wire (0.032in/0.81mm diameter) but always check the wire fits the hole in the half-drilled pearl you intend to use. The key to success when creating a pearl setting in metal clay is to create a mechanical connection between the wire and the clay. This is easily accomplished by distorting the tip of the wire before inserting it into the clay. Upon sintering, the clay shrinks and grabs onto the distortion, creating a mechanical connection.

For a surface-setting, this is achieved in a simple multi-step process:

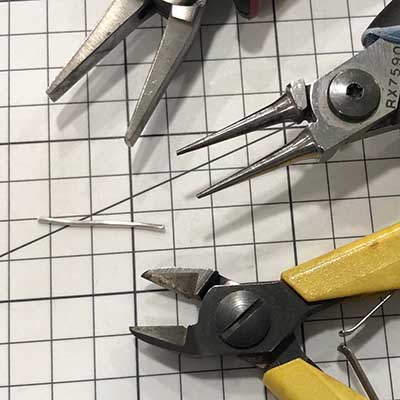
short section of curled wire

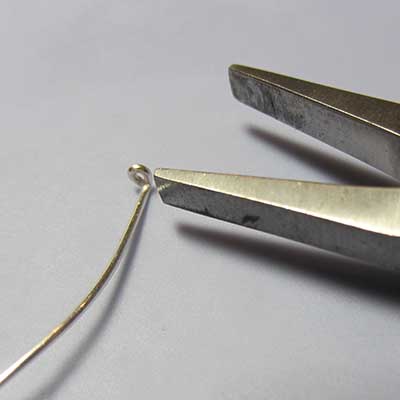
First distort the tip of the fine silver wire to be embedded (a simple loop is shown here).

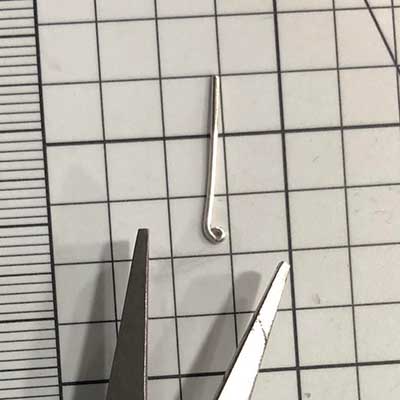
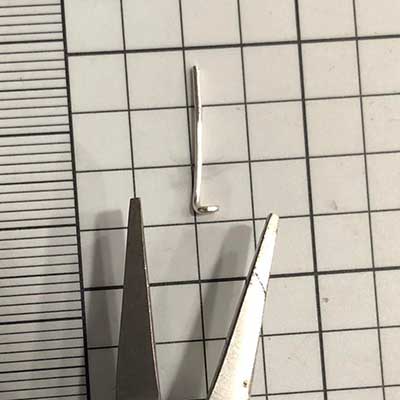
Short wire section with bent end

Create a 90-degree bend in the wire just above the distortion.

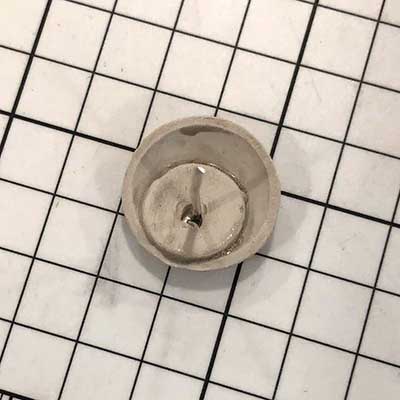
wire set inside a silver clay cup

Create your silver clay element. You want the clay to be wet OR you can first dry the piece and create a divot in the greenware to accommodate the depth of the wire plus a bit more to account for sintering.

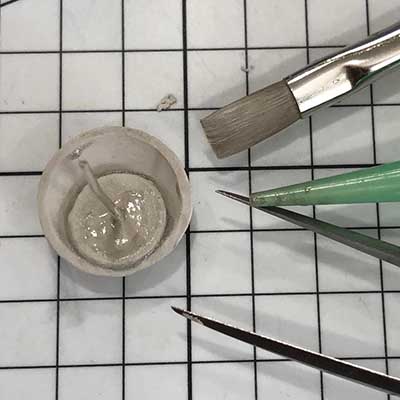
wire pasted inside a silver clay cup

Dip the bent top of the wire into silver clay paste. Holding the wire with tweezers, gently angle the wire and insert the bent tip into the surface of the metal clay just until the top of the bent section of wire is slightly below the surface.

Secure the wire into the surface of the clay with either silver clay paste, syringe clay, or additional lump clay.

Once the piece is fired and finished, you are ready to set the pearl:

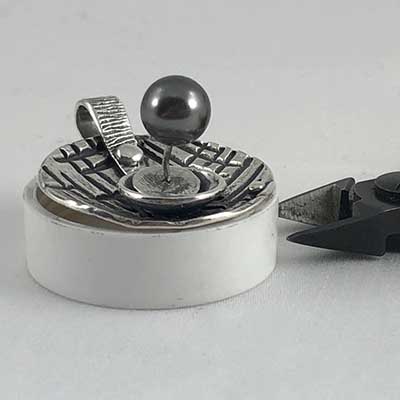
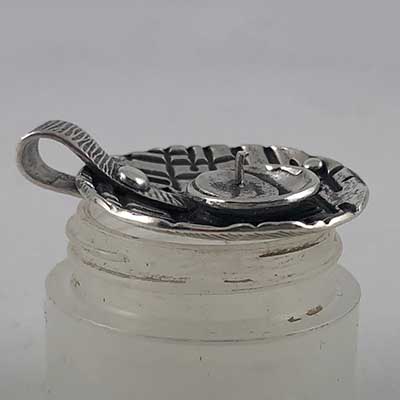
pearl sitting on wire post

Set the pearl on the end of the wire prong.

Mark the spot on the wire just below the pearl. This gives you an idea of how long the wire needs to be below the pearl.

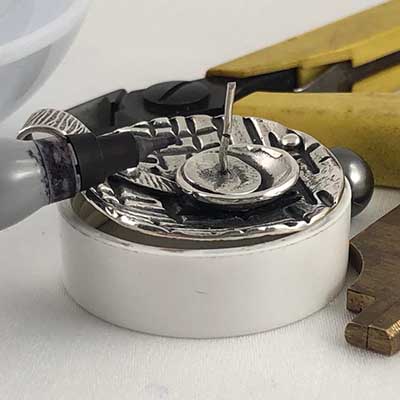
marking and cutting wire to shorten it

Measure the distance from the tip of the wire down to the mark and note the measurement.

Then measure this same distance from the base of the wire upwards and place a second mark on the wire at this height to indicate where you will cut the tip off the wire.
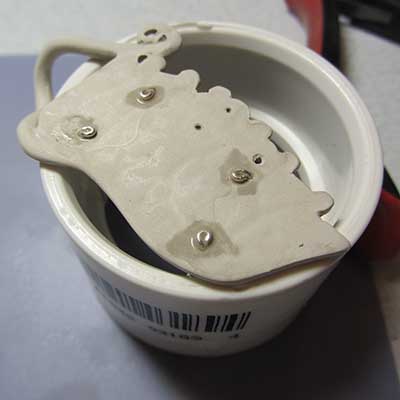
Measure again (measure twice, cut once!) to ensure that your markings are correct and that you are not cutting off too much wire.
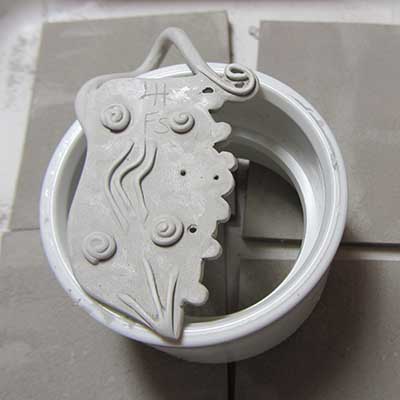
cut wire end on pendant

Cut the wire.
Check the setting of the pearl.

If the pearl is sitting too high, remove the pearl and cut a small piece off the tip of the wire.
Repeat the last two steps until the base of the pearl sits perfectly against the top of the metal with the post fully inserted.

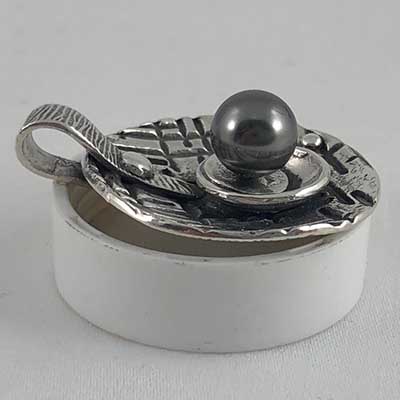
Pearl added to a pendant

Rough up the surface of the embedded wire slightly with a coarse sanding pad.

Add a drop of 2-part jeweler’s epoxy or jeweler’s adhesive to the tip of the wire.
While holding the pearl steady, push the wire prong into the hole of the pearl until it can go no further.
Clean up any excess jeweler’s epoxy or adhesive, if needed.

Allow the epoxy or adhesive to completely set before wearing the piece.

For an edge-set pearl or half-drilled stone (or a ‘peg’ setting), there is a wonderful set of guidelines in the Setting Stones After Firing article in AMCAW’s Learning Center.

This technique can be tweaked to embed a variety of fine silver wire sizes in wet metal clay.

In the ‘Fire’ pendant shown here, notice the complementary beads set in the North/South/East/West positions around the cabochon.

The artist has embedded 24 gauge (0.020in/0.51mm) round fine silver wire with a longer stem than used to set a half-drilled bead.

After firing and finishing, the longer wire stems are creatively twirled to capture the colorful beads. The twirls beautifully complement the shape of the swirls in the pendant.

Pendant with wire and silver clay

Pieces by Lisa Barnes

Pendant with wire
Short wire section with bent end

Pendant by Loretta Hackman

Bezel Setting In Wet Metal Clay

An adaptation of this classic metalsmithing technique allows you to place fine silver bezel wire in freshly-rolled metal clay to create a setting for non-fireable cabochons. It can be adapted for metal clay without any need for soldering and works especially well for smaller cabochons (1in/2.6mm or smaller). It is important to note that a portion of the bezel wire is exposed above the surface of the metal clay and at least 1mm of the bezel wire is embedded into the soft clay.

Key factors to consider when creating an embedded bezel setting in metal clay include: 

  1. ensuring that the bezel is tall enough to both capture the cabochon after firing and sit at least 1mm into the metal clay,
  2. ensuring that the metal clay beneath and immediately around the bezel wire is thick enough to prevent tearing during the stresses incurred during the sintering process, and
  3. ensuring that there is at least a 4mm wide frame of clay around the entire cabochon setting.

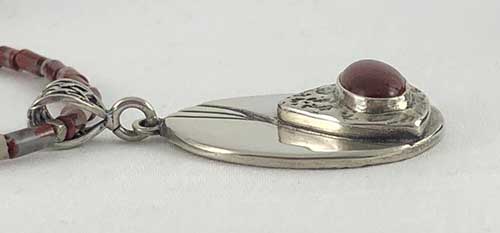
For a bezel wire that is set 1mm into a wet metal clay base, the base thickness should be at least 2.5mm or 10 cards. If you intend to create a larger piece, consider setting the cabochon in a smaller slab sitting above a larger base. You can see this in the side view of the oval setting shown here.

The clay from top-to-bottom should be at least 2.5mm and can be accommodated with a 1.5mm setting slab above a 1mm design slab. In the example shown here, a 1.5mm textured slab was applied wet to a wet 1.5mm base. Adding the extra thickness to the base slab was a design decision that was made to allow the option of carving.

Since the metal clay will shrink during the sintering process but the bezel wire does not, it is probable that the base piece under the bezel will dome during firing. This doming effect can be used to your design advantage.

See the Setting Stones After Firing article in the AMCAW Learning Center Resources for an excellent overview of this topic. That article also includes general protocols for working with creating bezels in base metals that require carbon firing.

Pendant with wire and silver clay

Pendant by Loretta Hackman

Piece by Nancy Miller, Photo Erica Miller

Pieces by Nancy Miller, Photo Erica Miller

Low-Temperature Firing

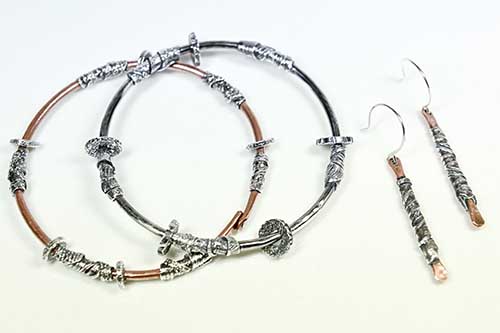
These novel bracelets and earrings were created using 10-gauge (0.1in/2.59mm) sterling silver or copper wire and low-temperature fine silver clay.

Since we are protecting sterling silver wire elements in each bracelet, the firing temperature for these pieces must not exceed 1300°F/705°C and the firing time is limited to under one-hour, high-temperature fine silver and sterling silver clays cannot be used.

NOTE: the low-temperature protects the sterling wire and solder join in the sterling bracelet; it also protects the sterling rivet in the copper bracelet.

  • The fine silver decorative discs were fired before adding them to the pieces. They impart fun kinetic activity to each bracelet.
  • The sterling wire was depletion-gilded prior to forming. After forming, the decorative discs are added to the wire. The wire is then soldered with hard solder, which is not disturbed by the low-temperature kiln firing.
  • The copper wire was formed, the decorative discs were added, then the ends were flattened and riveted with sterling wire.
  • Hammering the sections of the wires where the clay will be wrapped creates texture that allows the silver strips to form a mechanical connection with the wire.
  • The wire beneath the hammered segments was coated with fine silver paste to improve the connection of the clay to the wire.
  • Thin, long strips of low-temperature fine silver metal clay was wrapped around the wire. The ends of the clay pieces wrap back to connect to themselves.
  • Each piece was dried, finished in the greenware stage, and then fired at 1300°F/705°C for 45-minutes. After firing, the sterling piece was pickled and then rinsed in a baking soda solution to neutralize the pickle acid; the copper piece was simply quenched immediately after firing.
  • The pieces were patinated, cleaned up, and the exposed wire in each bracelet was carefully and deliberately hammered on a steel block to work harden which is a very important step.

The copper wire earrings were created following the same protocols as the copper bracelet.

Piece by Sian Hamilton

Pendant and brooch by Sian Hamilton

High-Temperature Firing

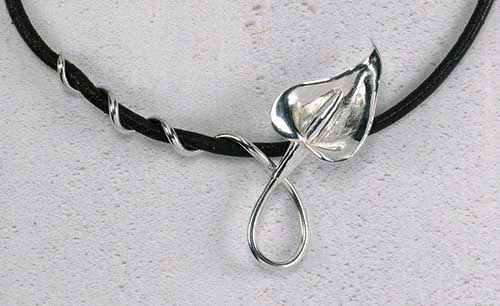
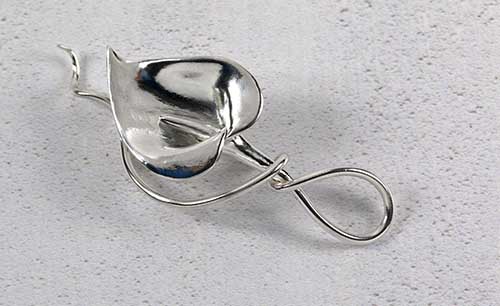
The beautiful calla lily necklace and pin shown here were formed using fine silver clay and 12 gauge (0.08in/2mm diameter) fine silver wire.

Since fine silver wire contains no copper, it can be co-fired with fine silver clay up to 1650°F/900°C without compromising the strength of the wire.

After firing, the wire can be carefully shaped to create graceful lines that complement and enhance the design of the piece.

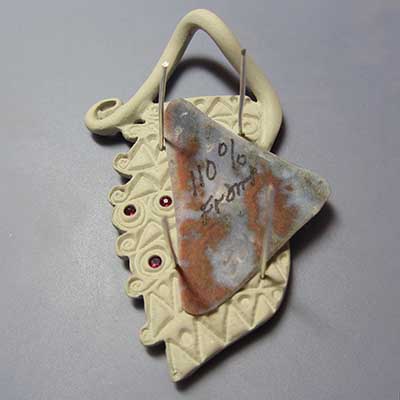
You can also use fine silver wire to create an artistic prong setting for cabochons or irregular stones that can’t be fired. Since shrinkage during sintering must be considered, the shape and size of the stone need to be accounted for during the earliest part of the design stage.

Piece by Sian Hamilton

A photocopied image of the stone magnified 110% to allow for the shrinkage of the specific clay involved in this design, is placed on the textured base. Holes are drilled to allow for four pieces of 20 gauge (0.032in/0.81mm) fine silver wire to pass through as prongs.

Piece by Sian Hamilton

The ends of the wires are formed into tiny loops which are then bent at a 90° angle.

cut wire end on pendant

This allows the straight piece of wire to pass through to the front of the piece while the loop sits flush with the back.

Pearl added to a pendant

In this example, a bit of syringe clay is spiraled over the dampened clay to allow for a good clay-to-clay connection. Since fine silver metal clay and fine silver wire have been used and the small rubies can tolerate a high firing temperature, the piece can be fired hot and long, ie 1650°F/900°C for two hours, to allow for maximum strength after firing.

For more guidance on this, have a look at Lis-el Crowley’s Creating Custom Prong Settings in Metal Clay for Druzy and Other Natural Stones in AMCAW’s Flash and Fire Tutorial Collection.

Adding Wire Between Firings

There are several creative options for incorporating fine silver wire in either sterling silver or fine silver metal clay pieces between firings. The first firing allows the metal clay to sinter and shrink. Fine silver wire elements are added after the first firing, then the entire piece is either soldered or fired again to permanently incorporate these elements into highly detailed finished pieces.

Earrings by Annemarie Klappe
brooch by Annemarie Klappe

Pieces by Annemarie Klappe

Russian Filigree (Powder Soldered Openwork)

Russian Filigree is an ancient technique that was perfected back in the days of Catherine the Great during the 16th and 17th centuries. It is an ‘open back’ technique for filling cells in an openwork wire design. Here, the wires are replaced with metal clay.

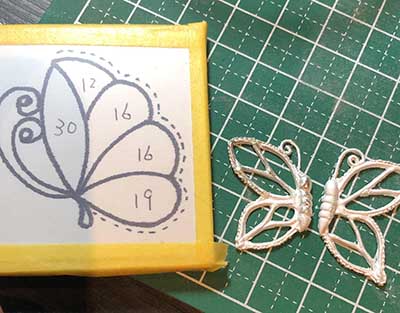
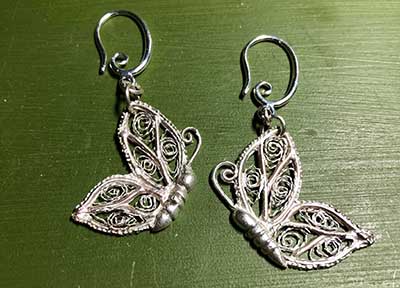
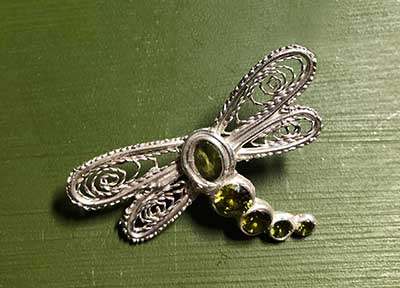
These pictures show the design progression for a pair of butterfly earrings and the dragonfly is shown as a bonus. The original design sketch depicts the outline, which can be constructed from either syringe clay or carefully constructed metal clay coils. The hollow cells of the just-fired butterflies are placed to the right of the sketch.

Sections of thin fine silver wire are first twisted then formed to fit perfectly inside the cells of the wings, having several points of tight contact with the edges of the cells. Powdered solder is used to attach the tiny filigree elements by torch-firing. A relatively new powdered solder designed for Russian Filigree contains its own flux and has unique characteristics. It is sold by Rio Grande and the information they provide says “it flows like an easy solder but, because much of the zinc burns off once it has flowed, in subsequent rounds of soldering it behaves like a medium solder. This feature allows the same solder to be used in multiple rounds of soldering on very fine wire with no risk of collapse in previously soldered areas.”

Cloisonné Cousin

In traditional Cloisonné, colorfully decorative artwork is created using enamel, glass, or gemstones separated by fine strips of flattened wire place edgeways on a metal backing.

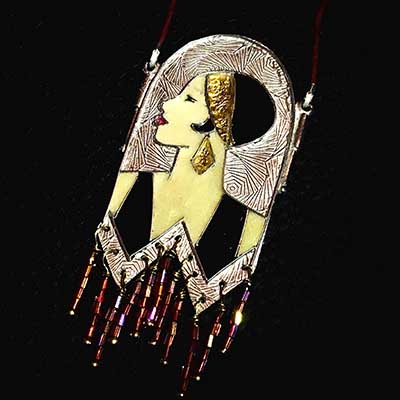
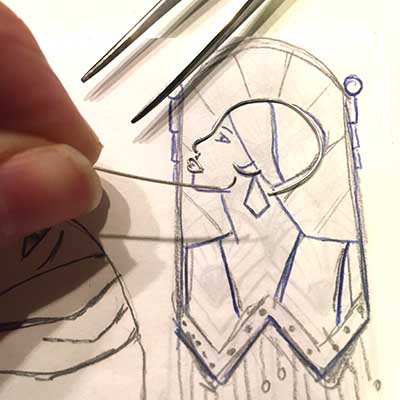
The example shown here celebrates a creative faux Cloisonné technique. It all begins with a sketch.

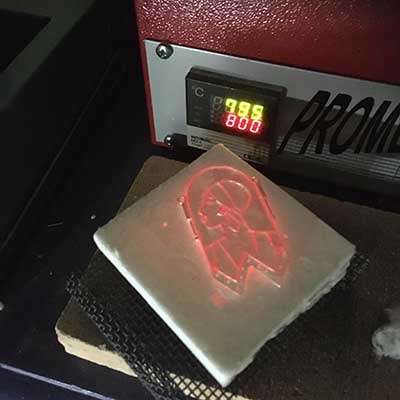
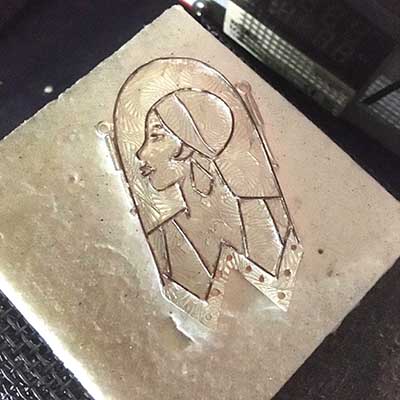
Here, an Art Deco Flapper Girl is sketched with simple clean lines. A metal backing is created and fired using a shallow-textured fine silver clay. Lines formed from 0.5mm (24 gauge; 0.02in) round fine silver wire are shaped and cut according to the sketch. Silver clay paste is used to affix the wires to the fired base. You could also use overlay paste or oil paste. The piece is refired to adhere the wires to the base. Resin is used to add color and life to the piece.

These progress pictures give you a sense of the wonderful potential that these techniques offer.

By Annemarie Klappe

Piece by Annemarie Klappe

By Annemarie Klappe
By Annemarie Klappe
By Annemarie Klappe
By Annemarie Klappe

Piece by Annemarie Klappe

By Annemarie Klappe
By Annemarie Klappe
Earrings by Annemarie Klappe

Piece by Loretta Hackman

Two-Step Bezel Setting

Another technique for creating a bezel setting for a metal clay piece involves adding the fine silver bezel wire to a pre-fired base. The wire can be either attached using metal clay paste and refired or may be soldered on.

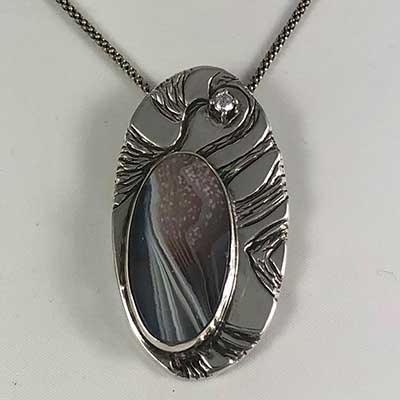
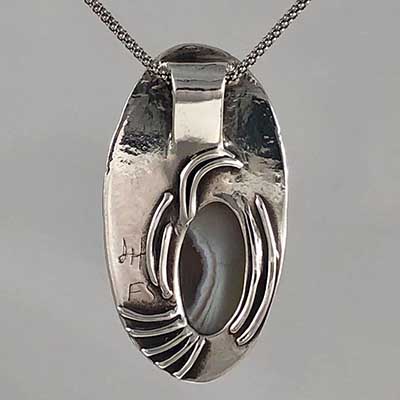
In the Botswana Agate and Fine Silver pendant shown here, a standard bezel setting for a 1-1/2 x 11/16in (37x18mm) oval cabochon was adhered with metal clay paste and fired on top of the 1.5mm thick pre-fired fine silver pendant base. If there was no carving component to this design, a 1mm thick base would be appropriate.
Note that, since the bezel wire was not set directly into the unfired clay, there is no distortion of the base during the second firing.

Comparing this technique to that for creating an embedded bezel, the base here can be much thinner since it does not need to accommodate the needs of embedded bezel wire.

See the Setting Stones After Firing article in the AMCAW Learning Center Resources section for more information on this topic.

Adding Wire After Firing

Hot Connections

There are several interesting ways to add wire to your fired metal clay. It is possible to solder wire and findings to metal clay elements. It is also possible to use the excellent self-fusing characteristics of Argentium Sterling Silver to capture fired silver clay elements.

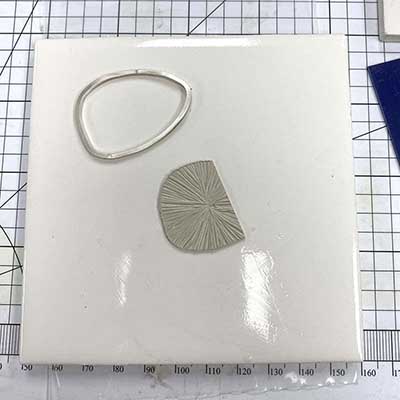
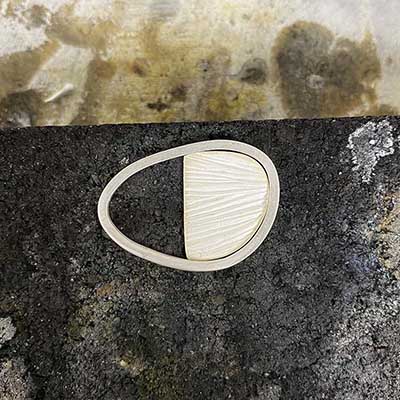
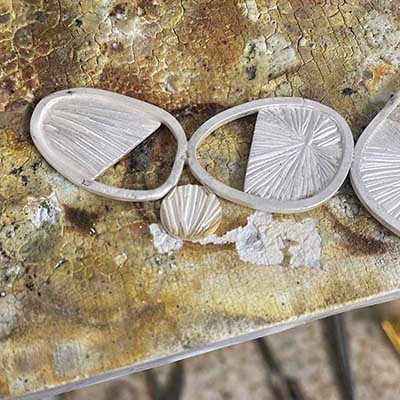
These pictures from a member only tutorial in the 20g Collection walk us through a technique for incorporating 14 gauge (0.057in/1.63mm) square Argentium wire and fired fine silver metal clay. Here, circles are created from 14 gauge square Argentium wire and the ends are fused together. The circles are then shaped and the outside circumference of those shapes is used to cut 1mm thick textured fine silver clay. The clay segments are finished and fired. Following firing, the fine silver elements are matched with their Argentium frames and the frames are tweaked to match the shape of the fine silver. The two components are then torch-fused together.

Fired, Fused and Fun and Charming Together: Metal Clay + Argentium in AMCAW’s 20-gram Tutorial Collection have more information on designing with Argentium and fired fine silver clay. Please note: you will need to be a member to access these tutorials.

By Annemarie Klappe
By Annemarie Klappe
By Annemarie Klappe
By Annemarie Klappe
Fired, Fused and Fun By Stephanie Chavez, 20G Collection (Member Tutorial)

Cold Connections

Wire lends itself to creating many different types of cold connections, joining things together without using heat. Think jump rings, headpins, the beaded rosary link, rivets, woven accents, wire stitching, and the simple but powerful beaded dangle.

From a metal clay perspective, using wire can be an elegant afterthought, such as adding that simple bead strung on a headpin and dangling from an earring charm. Or it can be an integrated part of your piece whose addition is planned out in the early design stages.

Metal Clay and Beads, 1B, Sylvia Q. Sierra, photo: Sylvia Q. Sierra

Piece by Loretta Hackman

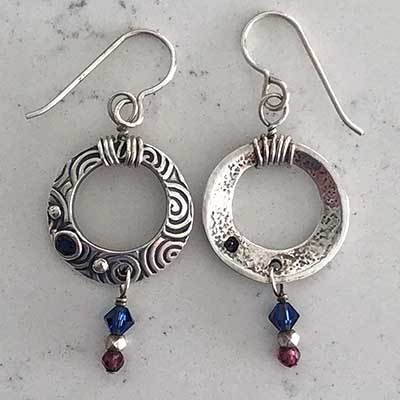
The first picture shown here employs the wrapped rosary link and sterling silver headpins to attach simple dangles to a pair of earring charms.

The wire treatment at the top shows a technique for creating a novel top loop. Using round-nose pliers, a loop was formed in the center of two pieces of 22 gauge (0.025 in/0.635mm) sterling silver wire.

The loops were twisted twice to create a sturdy connection, then the ends of the wire were carefully twisted three times against the top of each charm on both sides of the loop. Notice that the ends of the wire are hidden on the backside of the charms.

This technique ensures that the charms always remain centered with the French hook and hang straight, as opposed to sliding that might take place if you used jump rings to finish the piece.

Piece by Annemarie Klappe

Piece by Annemarie Klappe

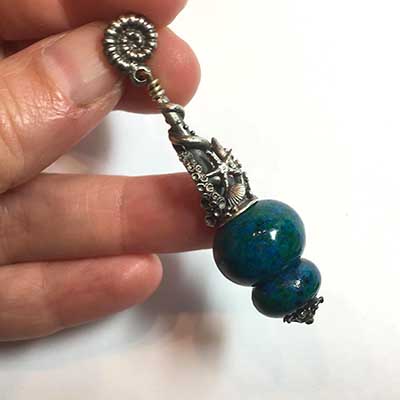
The second picture shows a slightly more challenging option, introducing intricate bead caps formed from silver clay. A long sterling silver headpin attaches the bead caps and Azurite/Malachite stones to the Ammonite-shaped topper using the wrapped rosary link technique.

This technique is a game-changer for jewelry artists as it is more durable and reliable than a simple open loop. It is seen in high-end jewelry throughout the world and can also be employed to create elegant and strong linked necklaces.

Notice here how the artist visually continues the flow of the graceful swirl in the top bead cap to lead straight up to the wrapped rosary link.

Pieces by Lisa Barnes

Pieces by Lisa Barnes

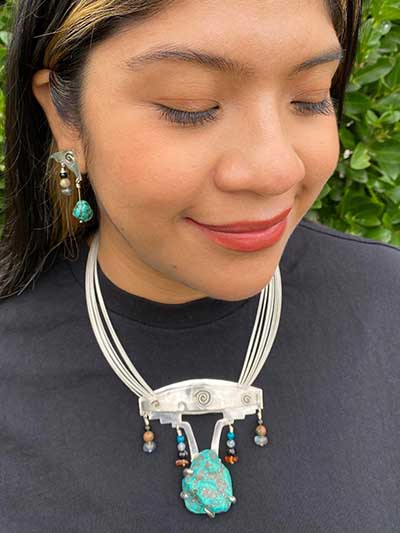
The third picture shows more effective and playful treatments afforded using headpins and the wrapped rosary link.

The stone beads dangling from the pendant intensify the earthy character of the Turquoise.

The Turquoise drop on the earring has a deliberate gap created above the Turquoise nugget, creating a visual line from the bottom of the beads that matches the angle of the bottom of the earring finding.

The holes in the earring and pendant were an essential part of the overall design and were drilled into the silver clay during the greenware stage.

Piece by Lisa Barnes

Piece by Lisa Barnes

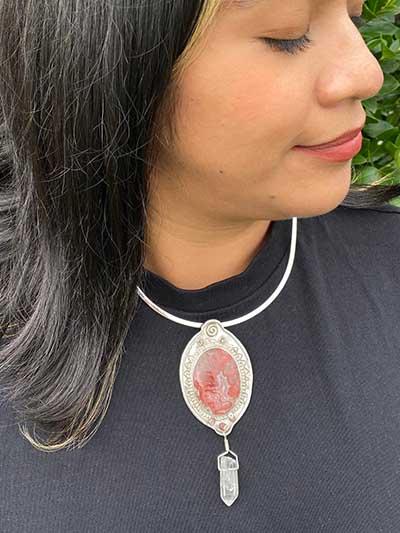
The fourth picture initially shows the pendant as a whole and then your eye may be drawn to the Quartz point briolette.

This icy stone is dropped from a pre-drilled hole, created in the greenware stage and secured by a well-wrapped piece of 24 gauge (0.020in/-.51mm) square sterling silver wire. Just above it the three small stones are secured by three posts of 24 gauge round fine silver wire that were seated during the wet clay stage explained in the earlier ‘Setting a Half-Drilled Pearl’ section in this article.

The stones were added after firing and the wire posts were gracefully swirled to both secure the stones and reflect the spirals in the overall design.

As we progress through these pictures, be aware that the intention to add stones has shifted more and more from almost an after-thought in the first pair of earrings to a deliberate design choice made from the very beginning. This is where the choice to add beads is planned before the clay is rolled out to intentionally place wire in the wet clay and where holes are drilled in the greenware stage. In the last two pieces, the choice to add stones with wire went all the way back to the design-on-paper stage.

Piece by Kyndell Goff

Piece by Kyndell Goff

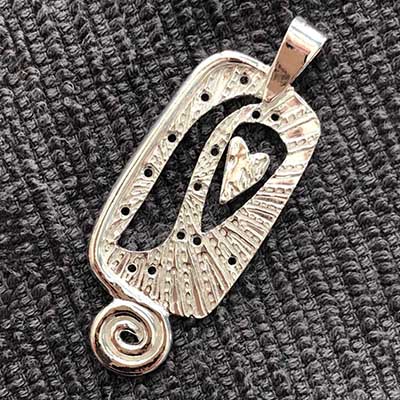
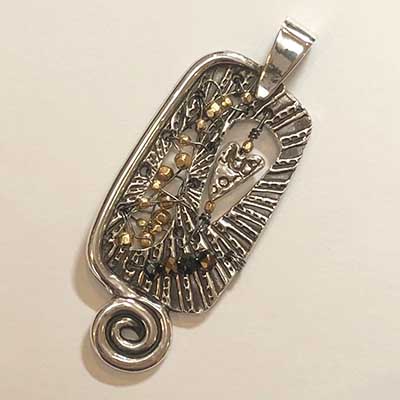
Notice the deliberate hole placement in this piece. Not only are the decorative negative spaces specifically cut out to accommodate the addition of gold-filled and Czechoslovakian glass beads to the fine silver pendant, the choice of using patinated 24-gauge (0.020in/0.51mm) sterling silver wire was chosen before the clay was even rolled out.

The drilled holes were carefully placed during the greenware stage to carve out a course for the beaded elements. Even the small heart-shaped bead was designed to allow for the space needed to add gold accents and negotiate the needs of the wire. Taking the time to form a meticulous design on paper streamlined the construction process of this elegant piece.

Piece by Kyndell Goff
Metal Clay and Beads, 1B, Sylvia Q. Sierra, photo: Sylvia Q. Sierra

Piece by Loretta Hackman

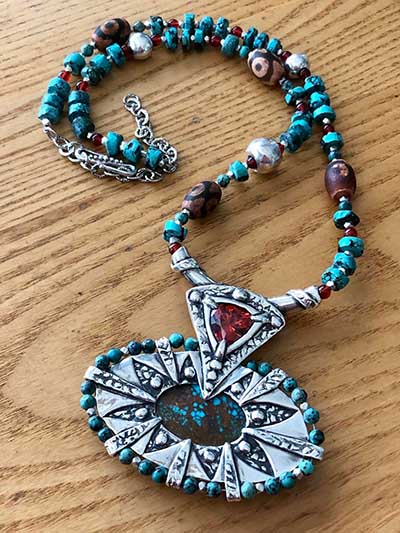
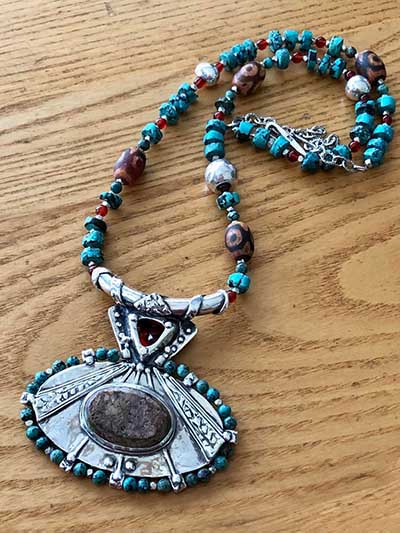
In the final two pictures, first focus on the beading around the pendant and how it got there. The inward-pointing rays that direct your eye toward the Persian Turquoise cabochon on the front of the piece each have a U-shaped end that connects to the back of the pendant’s edge. Looking closely at the back of the piece you can see several sections of 4mm round Turquoise beads and small silver spacer beads traveling through the holes of the rayed elements. These are strung on 49-strand flex wire which is a nylon-coated cable of 49 tiny strands of steel wire. The strand begins at a small tube located just above the top of the oval section, parades around the base of the rayed elements, and ends at a second tube. The beads are secured by sterling silver crimp beads.

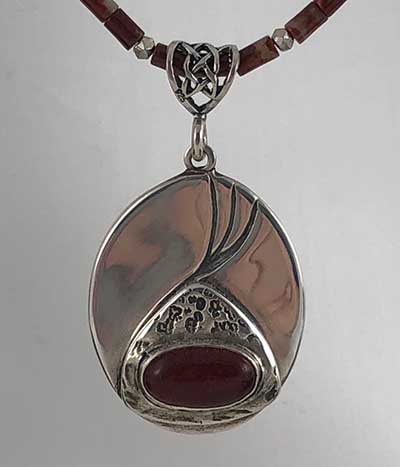
Note also the bezel treatment for this piece. Since the cabochon has a flat top and reverse-angle cut where the bottom of the cabochon is narrower than the top, it was appropriate to capture this stone from the back of the piece. The bezel was placed after the first firing and fired again, as described in the ‘Two-Step Bezel Setting section of this article.

Piece by Loretta Hackman

For more information related to adding beads to your metal clay designs, please see the Metal Clay and Beads article in AMCAW’s Learning Center Resources.

Important Point to Consider

This article has given you a lot to think about and is a collection of the knowledge of a few generous metal clay artists who are experienced in a wide variety of areas. Beginners may feel intimidated by this but just focus on what interests you and keep things simple until you build your skill and confidence.

There are many wonderful ways to wend and weave wire into your work!